Star Trek Online Tips for New Starship Captains
Star Trek Online Tips for New Starship Captains by Trace_Thorne
I started this for members of my fleet on our own forums, but I wanted to post it here because I think it could benefit everyone as well.
The goal of this is not to be a guide to any specific area of play, but rather a collection of tips, advice, and FAQs about how to make the most of STO’s gameplay. I have tried not to include direct spoilers about missions here.
This was firs tposted in Open Beta. I have updated it for release. If you see anything I have missed, please reply and I will try to add it to the list. Also if you see anything that is inaccurate please post about it too.
Note: Due to length, I have to split this up into multiple posts.
——————————————————————————–
General Character and Advancement:
– You start with two character slots. When you unlock klingon, you get a third slot. More slots are available if you have a lifetime or yearly subscription, and presumably you can buy more from the STO store when it opens.
– The ONLY choices you are locked into at character creation are your race, your gender, your traits, and your career path (tactical, engineering, science). Everything else you can change later, including the type of ship you fly.
– You unlock klingon characters at level 6. Klingons are primarily designed to advance through PvP.
– You can advance through any of the following ways: Episode missions, Exploration missions, Sector Control missions, Fleet Actions, and PvP.
- Episode missions are PvE “storyline” content. They can be completed solo or with a group.
- Exploration missions are dynamically generated missions in certain exploration areas. They can be completed solo or with a group.
- Sector Control missions ask you to fly around and fight in the battles you see appearing on the sector map. These are PvE encounters and up to 20 players can participate.
- Fleet Actions are scripted PvE encounters with up to 20 players participating. There will usually be three or four objectives that must be completed by the players and then a final boss (with friends). At the end of the fleet action, players are ranked based on how well they did, and receive rewards based on that. This is in addition to any mission rewards you get for completing the Fleet Action. You can only get the mission for a fleet action once, but you can do them as many times as you want outside of that.
– Some PvP takes place in designated star systems and is termed “competitive PvE”. There will be a PvE objective for each side, and the side that completes theirs first wins the map. There are also open PvP battles, accessed via a queuing system.
– Exploration, Fleet Actions, and PvP all reward unique “medals” which can be traded for equipment at certain NPCs.
– You do not have to take every skill available to you – early on they will all help, but as you advance you will find that some may not apply to the ship you are flying.
– Skill points are limited (because the maximum grade you can reach is Admiral 5). Once you reach Lieutenant Commander, you will need to focus your skills for the ship type you fly and the abilities you use most often. The ability to respec skills for a character is supposed to be available in-game by spending energy credits.
– You should always plan to max out the command skill for the ship you are flying relatively early.
– To advance to lieutenant commander at level 11, you must have spent a minimum number of skill points on lieutenant skills. (Note: This likely holds true for higher ranks as well.)
– Upon advancing to lieutenant commander, you will get a free T2 ship. You only get to pick once, so choose well. If you want the others later, you can get them, but they cost energy credits.
Additional info: You must be lieutenant commander 1 to qualify for a new ship. Lieutenant 11 doesn’t work.
Once you reach lieutenant commander, you must return to Earth Spacedock and talk with Admiral Quinn. You can not currently receive the free ship upgrade task from the Admiral via subspace communication. Just transwarp back to Earth Spacedock. He will then send you to a requisition officer that is located up the turbolift on the balcony overlooking the shipyard area. This officer can give you layman style details on what each of the ship classes do. There are also databases in the room which let you see the capabilities of each ship type.
– The starter ship is designed to teach you the basics of flying and using bridge officer powers. No matter which T2 ship you pick, you will find that it does not fly like the starter ship.
– You can customize the appearance of every ship you get once, for free (except for the bridge). This includes ships that you purchase at higher tiers. After that, customizing it again will cost you energy.
– It always costs you 1000 energy to change your bridge on a ship. Starting at T2, Different ships have different bridge options.
– It is possible to do any mission in any ship (of the appropriate tier). However, depending what you are flying, you may find that your tactics vary.
– When you first start the game, “open teaming” is turned on. This feature will try to automatically group you with other players working on the same mission whenever you enter a system. If you prefer to work alone for something, you can change the setting in your social window (press O to bring it up).
– For both space and ground, you can access a list of hotkeyable abilities by clicking the small datapad icon located on the right side of your hot button bar. (You can also press P to bring it up).
– Anywhere in sector space, you can use the Transwarp ability to quickly return to Earth Spacedock. 30min cooldown.
– You can change instances by using the “map options” menu next to your minimap. The option is also available via your area map tab if you pull up the full map. This is very useful for making sure you’re in the same instance as your team.
– If your team is all in a space instance together and there is an option to beam down somewhere, you will all beam down together.
– If you are having trouble finding a star system, check the system list in your map. If you don’t see it there, it’s in a different sector block. Most missions will tell you the sector name where something is, and you can look at the galaxy map to figure out which sector block you need to be in.
– You can edit your keybindings to bind a key to the “walk” action. This will allow you to walk, rather than run, in ground areas like stations.
– You can choose not to show your armor when on the ground by right-clicking the armor in your inventory screen once you have it equipped. You’ll get a menu that will give you the option to show or not to show the armor.
– To set it so that the game doesn’t automatically add you into whichever instance it pleases, go to any space or ground sector map. Open your map, and hit the button for “Change instance”. When the list comes up, click the checkbox at the bottom that says “Always let me choose…” The game will then remember this setting and you should be able to select your instance for any instance you enter.
– In order to get “credit” for completing a sector control battle or fleet action, you must be participating in the battle before all objectives are completed. If you enter one and find that the fight is over, simply wait for the reset to occur.
– When exploring, try to carry at least 10 of each commodity item available to you. This will allow you to complete first contact encounters.
– To wear fleet uniforms: Visit the tailor in the requisitions area of Earth Spacedock (or other tailors, such as the one at Starbase 39 Sierra). Select a uniform slot and choose Create or Modify. Click through to the uniform screen, then click on the Advanced button. At the top of the Advanced uniform customization window, there will be a drop-down where you can select a fleet uniform. Once you’ve selected it, you can modify the colors if you wish.
– If you have multiple uniform slots available, you can change between them at any time by right-clicking on your character portrait (top left) and choosing “Change uniform”
– To see how many badges, medals, and so on you’ve accumulated, go to the “Progress” tab of your character sheet. It’s all listed there.
Bridge Officers:
– When choosing your bridge officers, pay close attention to their ability lists. You do not want to duplicate abilities between your bridge officers if you can avoid it.
– You can customize the appearance of each bridge officer once, for free. You can also rename them once, for free. After that it costs energy.
– Your first few missions will award you with three bridge officers. Periodically after that you’ll have the opportunity to pick up another. You can also purchase them using starfleet merit.
– You must promote your bridge officers to gain access to their more advanced abilities. In order to promote them, you need to have spent a minimum amount of skill points on them first. You also must be one rank higher than the rank you are promoting them to (so, you have to be a lieutenant commander to promote a bridge officer to lieutenant). You can see the requirements to promote them by hitting the promote button on their character page.
– Bridge officers will use any available ability on the ground. In space, their abilities are limited by the ship type and the station they’re assigned to (ie, they can only use lieutenant powers if they’re at a lieutenant station).
– If you give items to your bridge officers, they will use them at the first opportunity.
– You should keep a close eye on your bridge officer’s equipment, if you are taking them on away teams with you. Make sure to keep it upgraded as much as you can.
– You do not have to use all your bridge officers both in space and on the ground. You can have some that specialize in ship abilities and man the consoles on your bridge, and others that specialize in ground abilities and make up your away team.
– If you beam down on an away mission and your bridge officers do not appear, you can use the /fillpetteamlist command to get them to show up. This should not be needed after the game launches.
– Make sure you spend time getting familiar with the abilities your bridge officers have. The key to soloing ground missions especially is in putting together an away team with the right combination of abilities.
– If you do not like the free BOs you have been given, you can use merit to get specific race/sex replacements at Earth Spacedock.
– You can swap out the abilities your BOs know at the BO Trainer. This officer is on the other side of the partition from the BO vendor. Be warned, you will loose BO training points assigned to any abilities you remove. However, unlike player training points, BO training points are an unlimited resource
– There are uncommon/rare bridge officers with improved versions of abilities. You will generally get these officers from completing episode missions.
Tips for Ground combat:
– If you have abilities that place turrets or shields, use them before opening fire when possible.
– Make sure that some members of your away team have weapons with “expose” attacks, and others have weapons with “exploit” attacks. Make sure you have one of each.
– Pay attention to your kit abilities. When solo, you may use one kit, but in groups, you may want to change it up to take advantage of some of the more unique abilities.
– When possible, always start firing from the aiming position “press C”.
– Many enemies will run up to you to melee, so it is advisable to open a fight with an expose attack so that you can do as much damage as possible before they are on top of you.
– Different enemies have different tricks. As you play, make note of the enemies that are tougher, summon allies, or use special attacks, and prioritize those targets.
– Make sure to keep a good stock of items for yourself as well as your bridge officers. They can make the difference between winning and losing a hard fight.
– You may find that some weapons are better for certain areas than others. For example, rifles tend to work best in open areas where you can get range on your enemies. When fighting in close quarters, you may find pistols more useful.
– You may be tempted to equip everyone on your away team with assault weapons, but this is generally not a good idea. It is better to go with a mix of weapon types due to differing special attacks and rate of fire.
– Use the “Stand here” command (the V symbol in the buttons over your team info) to plant your team in a single spot. This prevents them from running around and getting into even more trouble during a firefight. Right-click the same button to turn the command off. This is also useful for getting them through doors if they are getting stuck on the door frames.
– Use the “Fire on my target” command to focus fire on a single target. Use this to burn down dangerous targets quickly.
– Use the passive command (blue icon on the left side of the team commands) to prevent your away team from firing on hostiles while you move them to a new location. Particularly helpful in missions where there are tons of enemies moving around and you want to stealthily move around. You will need to use the “fire at will” command to make your team hostile again, otherwise they will stand there and die while petting their tribbles.
– All three of the commands noted above are also available for individual party members as well as for the entire group.
– You can revive an unconscious team member by using the CPR action (by default, this is bound to number 5 on your first hotkey bar on the ground. However, you can only use it out of combat. This works both on players and bridge officers.
– Your bridge officers will revive you after a fight if you are knocked out and they win. So, you might not want to choose to respawn if it looks like your officers are going to make it.
– Expose abilities have a chance to make an enemy vulnerable to exploit attacks. Exploit attacks, when used against an exposed enemy, will do significantly more damage, and, if they kill the enemy, will cause them to vaporize (which looks really cool when it happens).
Hit G to target the nearest “Exposed” target. Makes vaporizing them alot easier
Tips for Space combat:
– You can reinforce your shields by clicking on them in the display. This draws power from the other shields to boost the power of the shield you clicked. You can also click the center (your ship) to equalize shields. There are also hotkeys to do this. Using this ability is critical to staying alive in pitched battles.
– All bridge officer space abilities will automatically hotkey by default, so you can click them or use the hotkey.
– When fighting larger ships, you will generally be most effective if you channel power to weapons (to take them down faster).
– When fighting multiple enemies, channeling power to shields can help you stay alive while you cut their numbers down.
– Boosting your engine power makes you fly faster, and boosting auxiliary power makes you turn faster. This can be very important against some enemies that move quickly.
– You will turn much faster at one quarter or one half impulse.
– Full impulse can be used to move very fast, but only if you are not in combat. Use it when you need to cover a large distance. Also be careful, because it drains power from everything but your engine.
– Shields will not regenerate if their power rating is at or below 25.
– Weapon damage decreases based on your range from the target. This only applies to beam, cannon, turret , and plasma projectile weapons. Other projectiles and mines do not have distance/damage falloff.
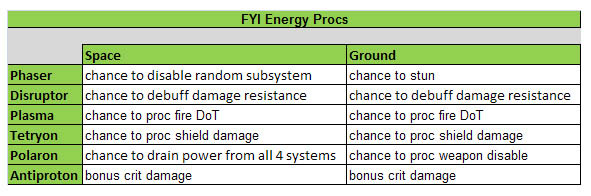
– Weapon power affects weapon damage for energy weapons (phasers, disruptors, plasma weapons). The more power your energy weapons have when they fire, the more damage they will do. Note: Discussion is still ongoing as to exactly how this mechanic works (some say it decreases the falloff penalty, others that it adds to the raw damage).
– You can modify the four default power presets. To do this, click the small button next to them that looks like three pages on top of each other, and choose number 3. This will allow you to manually adjust your currently selected preset. When finished, click the disk button to save the preset. If you want to set it back to the default, there is a button for that as well.
– All weapons will damage both shields and hull. However, some weapons are more effective against one or the other.
– You can start firing at 10km. If you have abilities that boost your attacks (like High Yield Torpedoes) you can queue them up just before you get into firing range.
– The way that you fly your ship in combat will vary depending on the abilities of the ship. Here are some common strategies to try:
- Dogfighting – Get behind your enemy and stay with them (or inside their turn radius) as they turn. This is most effective against larger, slower ships or if you have a fast and maneuverable ship.
- Jousting – Fly towards your enemy and past them while firing. Continue past the enemy (don’t leave weapons range), then slow down and turn back for another pass.
- Circling – Fly in a wide circle around your targets and fire beam weapons to wear down their shields, then turn in to finish them off with torpedos
– You can use line of sight to your advantage in space – ducking behind asteroids can give your shields time to recharge. However, your opponent can recharge his too. Note: There are some objects in the game where your LOS will be broken (you can’t fire) but the enemies will be able to see you. Generally, LOS works better with larger objects.
– If you right-click your beam weapons, you can set them to autofire mode. This is much easier than repeatedly pressing the spacebar.
– Ships explode when destroyed. It will damage your ship if you are too close. The damage type appears to be kinetic damage which means it will do a number on your hull if your shields are down. It will also hit your crew hard, even if your shields are up.
– Your crew affects your rate of hull repair. They are also used for some abilities (like boarding parties). They may in addition affect other things, like power levels, shield regeneration, and weapon refire rates, but no one is quite sure yet if that’s really true or not.
– You can attempt to disengage from a fight by switching power settings to engines, going to full throttle, and applying evasive maneuvers. Reinforce your shields with the emergency power to shields and manually diverting power to rear shields. Once you reach the 10km mark, the NPCs will stop shooting at you. However, they will often continue to chase, so make certain to keep moving away while you regen shields and repair your hull
– Missions scale to your team size by increasing the number of enemy ships present. If you enter an instance for a mission alone and find that there are far too many ships for you to be able to handle, make sure that you are not part of a team. Once you are not part of a team, exit the system, then wait 15 minutes and re-enter. The mission should now be scaled appropriately for a solo encounter. Note: Some missions, like the aftermath of the Starbase 24 rescue mission, add a large number of enemy ships on purpose because you are supposed to escape/sneak around them.

Recent Comments