S4 League Swords Complete Guide
S4 League Swords Complete Guide by Deathcoat
Table of contents~
(Note: Since this is gonna be a pretty long guide (Believe me, it will be.) I suggest using Ctrl+F to find what you specifically want to see.)
1.The Basics
—————————————
2.Deciding your gear
—————————————
3.The styles
—————————————
4.Fighting tips and stuff
—————————————-
5.Maps and tips about them
1.The Basics
Swords only mode is a mode that basically limits the game to 3 weapons and 2 skills (Or 3 if we count the HP +15 one)
Now the weapons are:


They are (In the order of the pictures) Plasma Sword (Oftenly called as PS), the Counter Sword (The CS) and the Storm Bat (The SB)
The skills are passive, meaning that they don’t have to be activated by pressing shift they just give bonuses such as additional SP and HP.

As the name implies,it gives 30 bonus Health Points (HP) and gives you a better chance of surviving in the match.

This skill gives you bonus 40 SP which is crucial if you want to be at least some kind of a striker in a Sword Only Touchdown Match.
Now that you know what skills and weapons you can use we will get to the real thing of this guide.
2.Deciding your gear
Now then~
After you take a better look at the weapons and skills above,you will probably ask yourself as a newcomer what to use and what not?
I’ll tell you in the start that EVERY weapon and skill is great for it’s own use but there are certain traits of some weapons that stick out more than the other ones.
(Note:When putting numbers of what damage a certain attack does, note that they are not accurate and will never be because there are a lot of factors deciding the damage such as Damage Pity in TDs ,The + on your own weapon, the Defense of your opponent and the area of where the attack hits.)
Let’s start shall we?
Plasma Sword
You get this weapon for 10 hours when you first make your character along with the Training Plasma Sword.
After playing a couple of matches with the Training Plasma Sword you will see that it isn’t strong enough to dish out damage seeing that it does half the damage of a normal Plasma Sword.
After using the 10h Plasma Sword you will probably want to buy it again in the shop, that will cost you:
1,195 Pen = 5 hours
2,295 Pen = 10 hours
6,795 Pen = 30 hours
The Plasma Sword is definetly a weapon you will want to have in a match ALWAYS.
Why?
>It is a fast, versatile weapon that can be used in almost all situations
>A must-have for a striker worthy of his name for sprinting into the goal
>An assasin weapon,delivers fast strikes to enemies and it has a flinch effect on all of the attacks (Flinch = A mini-stun effect that makes you immobile between PS attacks,can be fainted out of with about 90% of your SP if you’re using HP +30,+15 or about 50% while using SP+, if you are using the +6 SP Accsessory and the +6 SP face then it should take you less than 45% to faint out of it)
The attacks are simple and there are 4 of them, 5 if you count the combos
>Light slash. (Fast left click)
You will almost never use this thing aside from provoking your opponent in a 1v1 or a 1v1 encounter while in a match or just going beside your opponent,making that light slash hit, and thus making him right click his plasma sword and basically hit nothing, allowing you to backstab him,and thus, killing him.
This attack does minor damage, around 10 or 15, and about 20-25 on a critical while using a normal +0 Plasma Sword.
>Heavy Slash.(A bit longer left click)
This is the attack you will be using a lot, especially with the combo of the PS right click (Sprint)
When solely doing Heavy Slashes along with dodges you turn a heavy slash into a Wave Cut.
This attack does medium damage around 30-40 on a normal strike and around 70-90 with a critical while using a normal +0 Plasma Sword
>Jump attack.(Left click while in air)
Also known as “Stun”
This is why most defenders use Plasma Swords while defending. The stun makes you immobile for around 2 seconds.The stun duration is based on range the guy stunned you. This is a great suprise attack in 1v1s where a good stunner can basically win a round because he judged the enemy’s SP and movement, thus making him an easy target for a well placed stun.Note that the Stun and the Flinch effect differ from each other.
This attack does pretty small damage,about the same of the light slash.
>Silent Dash (Right click)
Also known as “Sprint” or just “Dash”.
This is the attack you will be using a lot. A full sprint does 3 hits and with the left click after the sprint 4 hits.
Also this is the range:

This attack does high damage, around 40-60 and on a normal strike and around 70-90 on a critical with a +0 Plasma Sword.
>The Sprint+Heavy combo (Right click+Left click)
This is the attack you will be using the most as a Plasma Sword user.
It is fast, and often results in a death, especially when inflicting a critical.
This attack does a great amount of damage around 80-110 on a normal attack and around 110-140 with a full critical strike. Note that a half critical strike (Critical sprint but not a critical heavy slash and a normal sprint but a critical heavy slash) does around 100-120 damage.
The heavy slash can inflict a wall slam which gives about 15 extra damage to your opponent and is automatically critical if the heavy slash is critical.
As you can see it delivers great damage and when mastered might be the deadliest weapon outta all the melee weapons.
Like I said,you should ALWAYS,and I mean ALWAYS have this weapon by your side,if for nothing else then at least for striking.
Counter Sword

You don’t get a training CS when making a character but you can buy it for the same price as the PS.
A few words about the Counter Sword:
[*]It’s easy to use
[*]Spammable
[*]It has fast, chainable attacks which makes it a favourite choice of many S4 League players.
Throughout my S4 playing career I encountered a lot of experienced CS users (Yeah, users.) which are basically the COMPLETELY DIFFRENT THING than the average Brasilian CS spammer. A real CS user can chain attacks, move from the danger, lure the opponent and then attack him again which mostly results in an instant death to the poor lured guy.
There’s 3 attacks and a special function of the CS which makes it my favourite.
[*]Normal Attack (Left click,can be chained up to 4 times with the last one being the slowest one and it makes you immobile for around 2 seconds after launching it, the 4th attack also has the longest range out of the 4)
What can I say about this attack? It’s an attack that mostly goes after the uppercut (See below) to hit the enemy, or it can be used to run away fast from danger,meaning launching it in the opposite direction after the CS uppercut you unleash before that.
This attack does about 20-30 damage per single hit and about 35-55 on a critical while using a +0 Counter Sword
[*]Uppercut (Hold the left click a bit longer, makes you wide open for any kind of attack after doing it)
The most widely used attack by all CS users. It can do a lot of damage if it hits and has a pretty good range, but the thing is if you miss it (which is easy if you’re not experienced with it) you will get yourself wide open for any attack and possibly giving that guy a chance to inflict a critical on you but with good aiming and seeing the situation properly you can with luck be a “pro” CS user.It also has knock back that can send your opponent flying when it hits.
This is the range of the uppercut:

This attack does about 40-60 damage on a normal hit and about 60-100 on a critical while using a +0 Counter Sword.
[*]Jump Smash (Left click while in air)
Or shortly named Jump Attack.
This attack is mostly used when wall jumping and almost always followed by an uppercut. What makes it diffrent from an uppercut is that you can dodge away freely after it and does not require cooldown like the uppercut does.
This attack does about 30-45 on a normal hit and about 50-70 on a critical while using a +0 Counter Sword.
And the function of the CS that cannot be considered as an attack seeing that it doesn’t do any damage is the:
[*]Revenge (Right click)
Also called Block.
Uses the arm of the CS to protect yourself against:
[*]Light slashes
[*]Heavy Slashes
[*]Sprints
[*]CS jump attacks
[*]CS normal attacks
[*]Storm bat swings
[*]Storm bat wind attacks
The only attacks that the CS cannot block is the PS Stun, the CS Uppercut and the SB Jump Attack.
Seeing that it blocks most of the attacks it is a great thing for you to use,especially because it stuns your opponent if he uses any of the attacks the CS revenge blocks. The stun is around 3 seconds and is not affected by any other elements.
The stun doesn’t inflict any damage.
The CS uppercut can inflict a wall slam which deals about 15 extra damaged and is critical if the uppercut before it is critical.
A CS should always be in your weapon setup also like the PS because it has many attacks that you will need.
Storm Bat
A few words about the 3rd and the final weapon used in Sword Only mode.
[*]A fast weapon, the Storm Bat jump attack is the fastest attack in Sword Only mode.
[*]A weapon based on the elevation of the floor you are fighting on.For example,it is near to useless on the Station-2 stairs if you are the striker, e.g when you are below your enemy.
[*]This is not a weapon that you should choose for your main killing choice, it’s more of a situational weapon and especially a suprise weapon.
It has 3 attacks:
[*]Bat swing (Left click)
The most simple attack of the storm bat. Similar to the Plasma Sword’s Heavy Slash.
Does quite a lot of damage, and can be a One Hit KO when being critical followed by a wall slam.
It does about 30-60 damage on a normal hit and about 60-100 damage when it’s a critical.
[*]Jump attack
As I said, the fastest attack out of all in the Sword Only mode. Alongside that it inflicts great damage and is mostly an OHKO on a critical.
It does about 55-80 damage on a normal hit and about 80-120 damage on a critical.
[*]Storm/Wind attack
Now, about this attack.
It makes you rotate 360° per one swing and can be chained up to 3 times.
The more the chains,the more the damage but also the higher cooldown after them.
The special thing about this attack is that with right timing you can inflict a critical (The attack has diffrent animation) with each swing and can sometimes kill your opponent if you do it correctly. It has a high Area of Effect and can be used on big groups of people for fast kills.
All in all,the storm bat wind attack is something you should use more for retreating than for actually attacking,only attack with it if you are sure it will KO your opponent (or opponents)
The damage varies a lot so I won’t say anything about it.
The SB Swing attack can inflict a wall slam that deals extra 15 damage and is critical when the swing before is a critical.
Like I said, it should be more of a situational weapon than your main weapon. That’s why most people don’t have it in their setups.
Now for the skills:
HP Mastery or HP +30 is a passive skill and gives you 30 extra HP.
You should use it almost ALWAYS in DMs because it will help you a LOT.
No matter if you’re a pro player that played Sword Only DMs for a long long time or if you are a newbie to this whole game and this mode.
From my personal experience it is much much better to use HP +30 in TDs and DMs because it is just a skill that you will need seeing that weapons deal great damage and you will die fast. Not even mentioning AP++ weapons that can OHKO you.If you’re not sure you can handle a 1v1 encounter in a TD you should take this skill always with you.I’ve been doing it for 7 months without ever using SP+ in a TD and I’ve always had 1st tier scores in 90% of the matches I played.
If you’re an invader, this is a MUST-HAVE for TDs.The bonus SP is just not worth you being able to survive in high-classed matches where everyone uses AP.
SP+ is a good skill to have when TDing but it is close to useless in DMs.
Even in TDs, use it only if you solely concentrate on scoring and not on killing people.
———————————————————————————————————
Now that you know almost everything about all the weapons and skills you are ready to choose your weapon setup!
Take to mind what I said up there and then choose your setup for all 3 modes!
3.The styles
You’ll be using these styles MOSTLY in DMs and 1v1s.
You can divide the styles into defensive and offensive ones but it’s basically all the same thing. So yeah,here they go:
Pure PS only
[*]This style combines wave cuts (Dodge+Heavy slash,hoping it will hit),stuns and sprints.
Mostly, if in a 1v1, it consists of stunning your opponent while previously trying to wave cut him and then sprint-backstabbing him. In 90% of the time, the guy that stuns wins. In TDMs you basically wait for the guy you’re aiming at to attack your teammate,and then when he leaves himself wide open just sprint+heavy combo him and move on to the next guy.In TDMs you only need to watch out not to get backstabbed by other people and you’ll do just fine.
Also, in 1v1 DMs, mostly when you run out of SP and you know you’re gonna get stunned,you will mostly sprint into the guy when you see an opening, if you can aim sprints well, then it’s a lifesaver.
Blocka
[*]My favourite, after getting base knowledge about the CS you will see that the block can save you A LOT of times.
Even when you’re spamming CS, or whatever you’re doing, switching fast to CS and pressing that right click can save you alot of times since most PS sprint “spammers” just sprint into people, and seeing that the block can block sprints…Yeah, they’re pretty much screwed.
PS Blocka
[*]This is possibly the most complex thing after the Comet Style to use effectively.
Whenever you fail to be a blocka, and you get hit by a PS sprint,if you do the timing right (The timing is somewhere between the PS sprint and the heavy) you can faint out of that attack at the cost of a NORMAL dodge (Yes, I’m aware this is a glitch) and if you switch to block fast enough he can get stunned while doing his heavy slash which is much better than just dodging away from him and then PS backstabbing him. Trust me, I did this a lot of times.
CS Spamma
[*]I think this doesn’t need to be explained… <_<
Comet Style
[*]Basically, moving around like a 1337 ninja not getting hit,doing a comet, attacking him when he doesn’t expect it.
Doing a meteor helps also, to curve that comet, roar. I’ll get to that later.
Note that this is the hardest style to use but not necessarily the best.
All-round
[*]This is the best style of ’em all.
It consists of everything, always unexpected, et cetera, et cetera.
It’s just awesome ;3
It combines all the styles into one, that you can’t even call a style, that’s why it’s the best, at least in my opinion, and my type of gameplay
—————————————————————-
4.Fighting tips and stuff
Okay, first off a few things you probably knew by now:
>In Swords Only, patience matters, a lot. If someone misses you and sprints into the wall or air, you just sprint him back but the difference is you’ll hit him and kill him. But, if you didn’t wait for him to miss you, and sprinted instead, and if you missed by any chance, he’d kill you.That moment of patience matters alot, especially in 1v1s.
>When doing DMs always climb high obstacles especially on Neden 2 the boxes and things, then wall jump, and CS smash your enemies. Mostly they’ll think you’re hiding but you’ll prove them wrong.
>In St2 TD, scoring with the stairs is really hard, even for some pros. Take the safer and possibly the easier route which will lead you probably to a score.
>Don’t cry
Yeah, like that guy from yesterday who said he’s gonna kill everyone, that’s against the code of honor in basically every game, Swords Only, Guns only, S4 or not, doesn’t matter, it’s just bad and childish, and not even worth mentioning.
No matter what he’s doing (Yes, even hacking, he can even report you for insulting him) don’t goddamn rage and cry about AP++ and stuff.
Believe me, I’ve beaten people with AP++ that are generally great swordsmen and I’ve beaten them with only a +4 PS and +5 Close Range Defense pants, and I’m not even kidding. Yeah, it’s hard, but that’s what makes it fun.
>All in all, have respect and be respected.
Not all of the pros and great guys in S4 were like that from the beginning, they had their idols and pros that either quit after or they surpassed them. There’s a lot of space up there,but you need to climb the ladder. Even if you lose a 1v1 sometime, don’t give up, it might be because it’s not just your day, you judged the situation wrong,you were rushing et cetera et cetera.Always aim to be the best and play the game for victory,but don’t get all “DAMN AP ****, I’MMA **** *** YOUR **** SO YOU HAVE TO **** SIDEWAYS.” when you lose to someone.
And remember, rage is troll food, and your nerves aren’t really gaining anything from all that e-stress.
Now that you got these tips,let’s start with the REAL stuff:
1.Male or female?
I’ll tell you some facts right at the start:
>Females look better, face it
>The dodge animation is absolutely better than the male one and is faster and can be glitched to cancel animations and stuff.
>The CS spamman myth:
Okay,for some people,the CS spamming is faster (The uppercut) with the female character than the male one,no,that’s not the reason you see female characters BRs and turks spamming like assholes,they just can’t find real girls so they do that.But on topic:
I decided to record a video of both genders spamman CS like maniacs, and…
http://www.youtube.com/watch?v=PTFnCndN55o
(Note,I haven’t done any speedups or anything but FRAPS seems to record stuff 2x faster than it normally is, but the female spamman is still faster than the male one so…)
Yeah, that female char pretty much owned the male guy. You see, that’s one of the reasons you should use a female character.
The female character seems to “jump” up a bit, when uppercutting, thus getting more range.
But yeah, I don’t know, go with what you’re most comfortable with, personally, I’m comfortable with the male character, because of the dodge and stuff, but yeah, like I said, do yo thang.
2. A bit advanced techniques
Comet
Since the sword only mode doesn’t have many special things/glitches except comet,I think it’s about time you learn about it:
You basically do comet by holding CS revenge while moving left or right (Left is easier,at least for me,especially if your PS is on 1) and then you press the space and the button your PS is on (Like I said, 1 for me) at the same time and voila, you just did a comet.
Note that the comet shouldn’t be used for actual combat and should ONLY be used for reaching higher areas and running away from your opponent, can also be used to lure someone in a trap.
But I personally recommend it only for reaching higher areas and nothing else.
Meteor
You’ll need a bit of Comet mastery for this.
The meteor is basically a curved comet,or a dodge canceling animation.Now listen carefully on how to do it:
Put up revenge,move left,and the thing that differs from the comet is that you have your finger ALL the time on the number your CS is on (2 for me) and then dodge a little and just a moment after you dodge press your PS button (1 for me) and space in the same time. You’ll get something that looks like:
http://www.youtube.com/watch?v=aGTe5Wz7pvc
It does differ a bit from the comet and if nothing else it looks cooler x3
Do it Michael Jackson style~!
Okay,this movement style is absolutely great.
It almost makes you look like you’re flying,since I don’t have anyone to bug to fraps this for me (If someone has time pm me or post in here about it) I’ll just use a video where I dueled some guy and he was recording it all the time,just watch 0:37:040
http://www.youtube.com/watch?v=H_d5WGUb … r_embedded
See that?
I’m sure as hell that it wasn’t lag,it was MJ reincarnated.
It’s not anything that much useful but it’s a pretty cool thing to use all the time and to move like a real supahstar!
The base thing is just s+space+w+w+space+w+w+space+s + repeat and just move like that in whatever direction you want,the only thing you need to watch out for is that you need to press w+w really really fast and that makes it hard, but that’s basically in a nutshell, and it’s not that accurate.
Also,I managed to make a vid of me doing it but from 3rd person only,need someone to fraps me while I’m doing it cuz it doesn’t look the same.
http://www.youtube.com/watch?v=X2egHsBn … re=related
All in all,like every other type of movements, egs, airhuggin’ or whatever, use it ONLY if you can control it,meaning you can move where you want, when you want and in all directions, it’s pointless to try doing it but fail and be an easy target to other people,so if you can’t do it, stick to normal movement.
Also,the good thing about this movement style is that you basically move all the time (run actually) and you’re pretty much fast with it and it doesn’t take any SP at all if you do it fast.
—————————————————————-
5.Maps and tips about them
First off, let’s start with the most (over)used map in the whole Sword Only mode.

Yeah, that map.
As you can see from the map:
Station-2
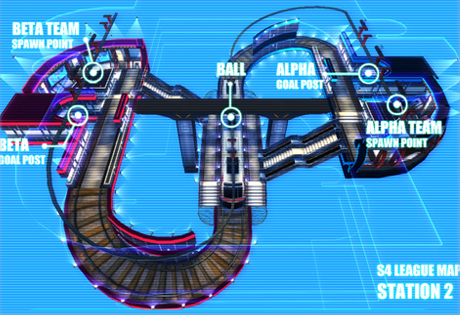
It looks like a very complex map at first, but after a game or two you will absolutely be familiar with it and won’t have any problems with it.
Unlike the S4 League rules which allow all weapons to be used, thus making players do roles such as defending, striking and invading, the Sword Only mode is the exact opposite of it.
Every player does everything, strikes, defends, invades, backups. Just everything. It would be pointless for a guy to just stand in his base wanting to defend while his whole team is charging to score.
Therefore, if you want to play Swords Only you have to be proficient in all of the roles.
In this map,jumps are needed but mostly,your team will score by going the other way and not the stairs because it is much harder to go on the stairs and try to score,than to lead your whole team the other way around and killing all opponents, and thus giving yourself a score.
On this map, the CS/PS combo dominates above all (Especially the CS <_< ) and it’s the 2nd most spammable Sword Only map after the Station 1.
And then you should judge if the situation is good for you to proceed by the stairs.
These are the basic jumps you will need to know for scoring by going the stairs:
http://www.youtube.com/watch?v=OeC9CDZ-E7o
The unwritten rule of Station-2 is simple.
No railing.
Just do that and you won’t be proclaimed n00b across the whole room.
Remember, play fair. I’m pretty sure that a Touchdown you worked for hard feels so much better than the Touchdown you got the unfair way.
Okay,and here’s a vid of why you should and should not play st2:
http://www.youtube.com/watch?v=M-jh1KqvRRY
The skills and weapons & why are:
SP+ (As you can see the map is pretty big and you need a lot of SP to run and move fast across it)
HP+30 (I’d reccomend this even more than the SP+ seeing that it’s a map you can easily get spammed on, especially in the train)
PS (Like I said,a must-have,this is the thing that is basically the score itself because without the fast PS sprint you can get killed before actually walking into the goal)
CS (Your main killing weapon on this map)
SB (In my opinion,it is only usefull for stopping enemy strikers that go on the stairs wanting to score,so it’s not really that important seeing that you can CS ’em off the stairs,but the thing you will want with the storm bat is it’s OHKO Jump Attack which can kill them in 1 shot and especially because the stikers have SP +)
I don’t know why but this map seems the most popular one mostly because it’s easy to remember after 2 or 3 games and it’s pretty fun.
——————————————————————————————-
The next one is one of my favourites.

Station-1
It’s a pretty small map, not a lot of space for running.
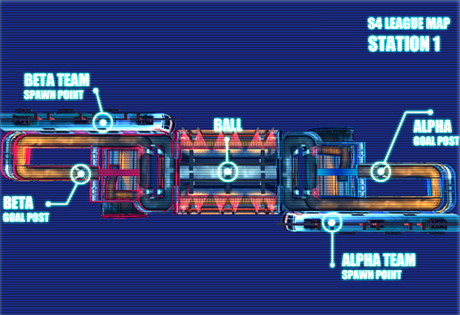
Not much to say about it except that it’s a spamfest.
You’ll rage 110% when some turk decides to CS, but that’s the price.
But then again, if we exclude the spam it’s a great map and pretty fun to play on.
You should try mastering the basic jumps on it before doing striking.
Like I said,since it’s Sword Only mode,you’ll be doing all the duties here so practice everything.
Also, with the CS jump attack you can score by jumping off a ledge and then smashing yourself right in front of the goal.
Skills and weapons & why:
SP+ (More crucial than on Station-2,you’ll need the extra SP for some of the jumps.)
HP +30 (Iunno,take it if you want, Station 1 is the only map I’d ever equip SP+ on because it needs a lot of SP for running. Though if you want to have at least a bit more chance to survive take the HP +30, but you’ll get spammed either way so…)
PS (Actually,this time,unless you’re going the other way around,the PS isn’t needed for this map)
CS (…Unfortunately,if you want good scores on this map,you’ll need the CS)
SB (Nope,don’t need it.)
So basically just have the CS and SP + ready and you’re good to go.
————————————————————————————-
Tunnel

The simplest map. ‘ Nuff said. No elevations whatsoever, killer-paradise.
CS & PS do great here, I’d reccomend the HP +30 because you need to actually kill before scoring on this map.
So yeah,CS,PS,HP+30 and you’re ready to go.
————————————————————————————-
Old School

This map is pretty wide and the PS kinda dominates.
There aren’t many jumps here that can be done without SP except this one:
You can also go the other way around by going on this rail thingy back there and thus making it harder for them to hit you,and with proper backup cleaning the way in front of you, you score >_O
Not much that I can say, just be sure you bring a PS and HP +30 because you’ll be mostly going the other way around instead of rushing head-on.
————————————————————————————-
Neden-3
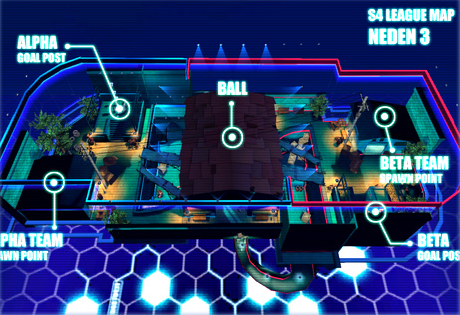
Unlike the Station-1 Sword Only you would come across like once a day.
This map is even rarer (In both TD and DM)
In case you ever play it,just be sure to know the jump to get to the ball by going on the bridge.
You’ll also need just a PS (like I said, the most needed weapon for a striker) and SP+ if you’re in a 6v6.
Aside from that, equip a HP +30 if it’s a DM.
————————————————————————————–
Colloseum

Same as the other TD maps, just bring in a PS and HP+30, and you’re set to go.
Be aware that the glass ground can be broken, and try not to stun too much or spam CS on it, since it tends to break after 3 or 4 hits.
Not really many things to be said about this map, if it were guns, then maybe we could do some combinations with anchor and walljumps, but seeing it as SO, nope, nothing to add.
———————————————————————————-
Side – 3


A really really really large map.
I really hate this map, not because of it’s enormous size, but because it’s wide open, and knowing at least 2 to 3 jumps is crucial if you don’t want to end the game with 10 points on this map.
CS is your worst enemy, but also ally in here, so make good use of the uppercut.
No elevations as far as I can see except for the stairs inside the ship, which is good for almost all weapons.
When playing here, always keep track of the ball, #1 priority, my man, because there’s 3 ways to attack here.
>From the roof
>From the bottom
>And through the hallway.
All weapons and skills do particulary good, so just go with what you have/are comfortable with
———————————————————————————–
Hyperium
The TD Blockbuster of S4.
Everything’s virtually breakable, no jumps to be aware of to learn in particular, and in my opinion, a TD map where you really need to make use of all SP.
It’s divided into 2 areas, the field, and the basement, to which you can get either from the sides or breaking the parts of the field with your God Hand (aka Counter Sword)
A fast runner gets the goal, so just keep your eyes on that ball and you’ll do good.
Try not to use CS on the field, since you’ll be going down most of the time, and being just dead weight for your team.
The CS is only useful for the basement level, as I said, but also has a great use for attacking, since you need all the protection you can get, so pump that right click up, and get revenge on the opponent team
The Bat does extraordinarily well, so I suggest you take use of the 1hit jump attack
PS sprint is a chase machine, so use that when defending, be cautious of the CS revenge people do.
Use PS when you need to hunt someone down in order to flinch them so they can’t score, or when they have low HP.
Don’t bother with random encounters and people who do the same to you, they’re not worth the points nor the time, keep your eyes on the ball and the person that has it, same goes for attack.
————————————————————————————
Temple-O

Again, an underplayed chaser map.
Just keep your mobility up, bring in a PS and SP+, and run as hell.
————————————————————————————-
Connest

Again, a chaser map.
Hiding on the rock or trees might be bannable if the room host and the room name says otherwise, but I doubt you’ll be really going that low.
Bring in a CS and SP+ for sure, since the ground is flat, there are no elevations that can go against your spam, so yeah, do it.
————————————————————————————
Temple-M

One of the underplayed TD maps, but in my opinion, it’s not really that fun anyways.
The quick survive in here, so keeping your mobility is your #1 priority, as well as judging the situation accordingly, as well as going back to defend is.
Get a PS and SP+, since you’ll need the SP+ for the stairs there, also bring in the SP+ accessory and face, can’t hurt.
————————————————————————————–
Neden-2

As you can see on the map below,this is a pretty wide map and leaves you a lot of opportunities.
It’s suitable for almost every weapon and is just great for suprise attacks.
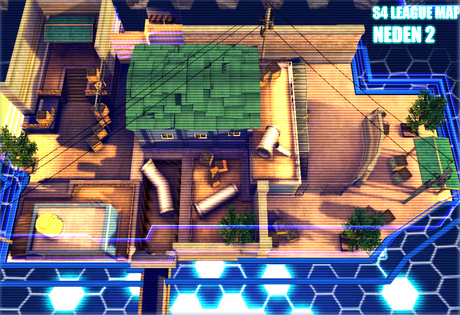
When in Sword Only matches, we basically divided this map into 3 areas.
The 1st one,on the left, the storage/warehouse in the middle and the famous “1v1 Arena” on the right.
What you need to know about this map is that it has a lot of places for you to get ninja’d if you’re not carefull.
There’s a much greater chance them 6 are gonna ninja you than you’re gonna ninja them. So therefore, you use common sense and lure them out, or gang them if there’s teammates nearby, a little teamchatting wouldn’t hurt also before planing an attack. Especially when CWing on this map.
The important thing also is that you should NEVER run after your opponent no matter how much HP he has left. Believe me, the element of suprise is far greater than any HP he may have. Just leave him be and he’ll eventually come to you. Just be carefull at all times.
So yeah, carefullness (is that even a word?) matters.
As for weapons and skills, all 3 weapons should do great (Especially the storm bat and it’s wind attack if it can cause criticals, because it can help luring the enemies or killing large groups)
And as always,equip HP +30.
——————————————————————————–
Blockbuster

Although I’m not a fan of Chaser Mode, this map can be fun, if you know how to play it.
Not really much to say than that you should really really really bring a CS, but be aware on how to use it, since the ground tends to break if you use that jump attack/uppercut too much.
Also, as in every chaser game, bring in your SP+.
——————————————————————————–
Neden-1

Welcome to the favourite map of most Sword Only and guns DMers.
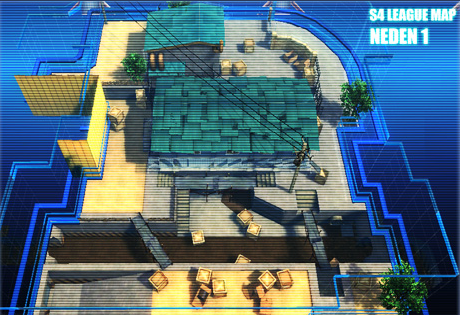
I’ll tell you at the start that the fights here are concentrated on basically 2 areas.
The sewers and the area on the left.
Mostly, this will be a game of attacking in waves.
2 teams clash on the area on the left, the people that win camp that spot until the wave of the other team wall jumps from somewhere and air CS ambushes them. Now it’s only a matter of survival,dodging spam, sprints and stuff,so movement here is crucial for survival and a good KDR.
Basically, the team that survives the most waves of attacks is the winner and 90% of the time you can tell the winner by the first 5 minutes of the match.
All in all, move fast, use HP +30 (It helps.. <_< ) and use CS air smashes.
Blocking with the CS also saves ya a lot of times against those air attacks and sprint hunters.
The CS and PS have great use here while the bat doesn’t have that much areas where it could be used effectively, though it is a good weapon of suprise.
————————————————————————————————-
Circle


Honestly, I don’t really know why this map is underplayed like Neden-3 but I’m pretty sure it’s because of it’s smallness and spammability.
The only tips I can give is that you should be carefull while fighting on that thing covering the circle and that you should use the Comet (Yay, finally a map where you can use comet effectively) to retreat back onto the platform and plan your next movement.
All weapons do equally good here, HP +30 recommended.
—————————————————————————————————
Circle-2

The overplayed chaser map.
People seem to like it because whenever you CS uppercut someone out of it, it’s instant death if it hits, but beware if you’re chaser too! Since you might be the one getting uppercutted outta here too, unless you have the Asteroid accessory, that is.
—————————————————————————————————
Highway

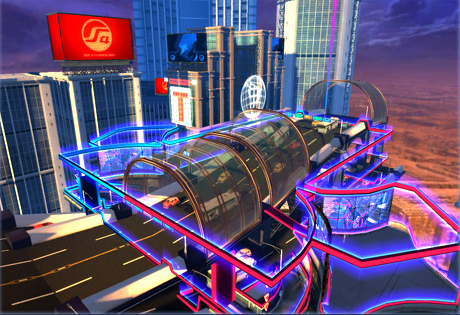
This map can be played in both TD and DM, this is also one of the underplayed Sword Only maps.
This map is possibly the largest out of all maps EUS4 has, and it’s a good place for a DM.
Lotsa space,it’s even hard to find your opponents in a 6v6 seeing how big this map is.
It’s divided on 3 levels.
>The roof
>The actual highway below the roof.
>And the area below the highway.
Most of the things are breakable such as the cars and the buses.
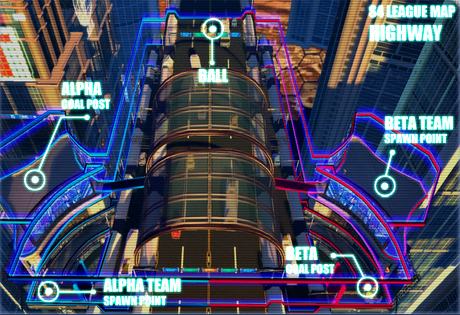
(Note, it says that on the alpha team’s goal that it’s their spawn, it’s not, the Alpha spawn is up there where it says Alpha Goal Post)
TD on this map is basically done on raw power like on Tunnel.
The more people you kill,the less defense there is to stop you.
When you sucessfully defend your goal post, you wouldn’t want to go all the way up the highway and then across it to enter your opponent’s goal and therefore there’s the bug that allows you to gatehop the lasers that are located on the lowest level of the highway. This is a glitch, but it’s not bannable to use it, so feel free to use it.
Like I said, you might want SP+ seeing that it’s the largest map in the whole S4 currently and you’ll be doing a lot of running. All weapons do equally great here.

Recent Comments