Pockie Ninja Handbook
Pockie Ninja Handbook by Nikolai
1.0.1 – Introduction
An unofficial Pockie Ninja handbook to guide you through the depths of this world.
1.0.2 – Table of Contents
1.1 – Pet Kennel
1.2 – Armory
1.3 – Synthesis
1.4 – Merchant Shop
1.5 – Trade Market
1.6 – Guidance Room
1.7 – Slots Machine
1.8 – undecided
1.9 – Miscellaneous
1.1.0 – Pet Kennel
The Pet Kennel is a place where you can feed your pets. It takes 2 hours to feed the pet, no matter how many foods you feed it. Here are some things to know while using this feature.
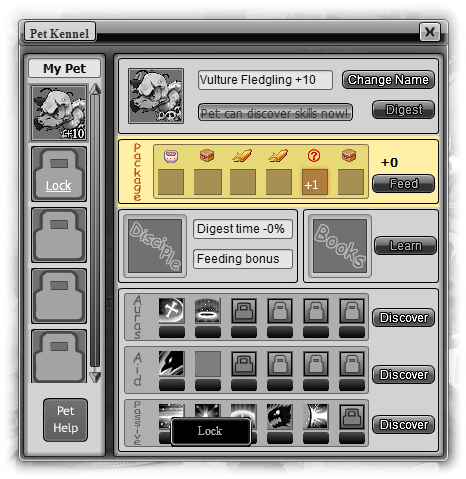
1.1.1 – Package
This is an area within the Pet Kennel window where you drag and drop various foods in. There are a total of six empty boxes with icons. What are these icons? They are food-type icons corresponding to certain foods like Grain, Vegetables, Debris, Meat, Dessert, etc. You can’t just put any food into each box. The food must be the correct type like a matching game. You can obtain food from the Visiting Residents or Collecting Foreign Matter quests at the Rewards Quest, Explorations, Item Mall, and Item Shop.
Food types: Grain(cereals), vegetable, debris(others), meat, dessert, medicine, and random.
There are two ways to figure out if the foods can be placed in the box:
- If you click and hold your mouse on a food item you have in your bag, you may see box(es) turn green. This means that it’s matching food-type and you can feed it to the pet!
- Put your mouse over the food-type icon and it should display what type of food-type it is. As you do this more often, you’ll know right away which food-type the icon is. Then in your bag, put your mouse over a food item that you plan to feed. There should be a long translucent box that pops up near your cursor. Look at the bottom of the box where it says Food-type. and beside it tells you the food-type.
I recommend the first method because some food-types, shown in the box when you put your mouse over a food item, may be different than its matching food-type icon in the Pet Kennel. (Grains = Cereals, Debris = Others, Random = Any)
1.1.2 – Digestion
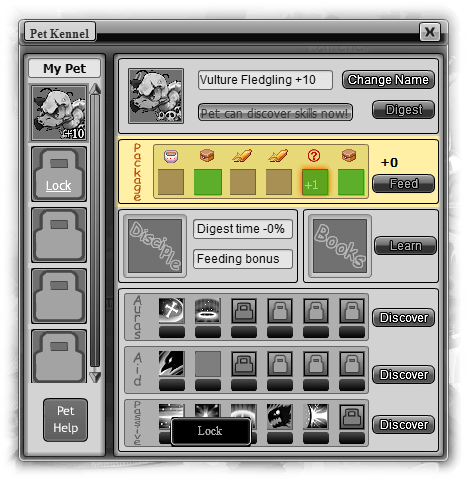
As I said above, digestion takes two hours to accomplish. But you can instantly digest by paying 8 gold/gift coupons. After two hours are over, you will notice that the food-type icons have changed. Also, you may see that your previous foods are still in the boxes. This means that you need to refresh it and you can do this by dragging your pet into your pet (you’ll notice the food will disappear). After that, you can put your pet back into the Pet Kennel.
Note: If you leave a food-type icon empty, it’ll remain there after digestion. It is best to buy the food in the Grocery section of Item Shop (100 stones each, hunger level: 5) if you cannot fill up all six boxes in the Pet Kennel. This will ensure that all food-type icons will be changed so you can use a high-hunger level food.
1.1.3 – Hunger Level
Your pet’s hunger level bar is located above the Package section, beside the pet’s photo. When you first obtain a pet, it’s hunger level is initially at zero. But when you feed it, the hunger level increases. You can see the amount of hunger level that the food increases by putting your mouse over the food item and look for Hunger level decreases. For example, [Eggplant] has a hunger level of 147 and would increase your pet’s hunger level by an additional 147 if you fed it to your pet in the Pet Kennel.
Note: Hunger level capacity increases as you upgrade your pet to +1, +2, +3, etc.
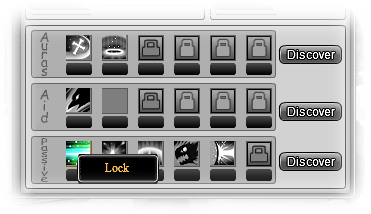
1.1.4 – Discover
When your pet’s hunger level reaches the maximum (the hunger level bar is all green), you are able to ‘discover’ a skill! The ‘discover’ buttons in the Pet Kennel window will be colored orange which means you can discover a skill. If all your pet skill slots are full in a row and you try to discover a skill, the system will choose a random skill slot in that row and replace it with a random skill.
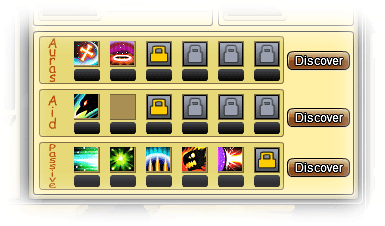
There are three types of pet skills: Auras, Aid, and Passive. You can see a whole list of all the pet skills in sangeung’s thread: here.
1.1.5 – Pet Skill Lock
In the Item Mall. you can buy an item called [Pet Skill Lock] (28 gold/gift coupons) which will lock only one skill of each type, at a time. This is useful when you have filled up all the open skill slots with skills. Like I said above, if you discover again with a row of full skill slots, it’ll take a random skill slot and replace it with a random one. If you lock a skill (click on skill in Pet Kennel and choose Lock, must have [Pet Skill Lock] in bag), it will not be replaced.
1.1.6 – Notices for Pet Upgrades
- The hunger level capacity will increase.
- Your pet will have 0 hunger level when you upgrade it successfully, even if it had some hunger level before.
- When your pet is upgraded to +3, +6, +9, +12, etc.. you can open a closed skill slot. (costs stones to open)
- Currently, you can only upgrade your pet to +10.
1.2.0 – Armory
The Armory allows you to enhance, refine, enchant, and slot your equipment.
1.2.1 – Enhancement
You can enhance a weapon at most 8 times successfully. This will give an substantial attack bonus from the original. Armors like boots, gloves, chest, or helmets are also enhanceable. Instead of giving an attack bonus, you get HP bonus if you enhance armor.
To enhance, you need an [Enhancement Talisman] or spend 8 gold/gift coupons. These are easily obtained from the slots machine (see 1.7.1). You may get them from the third place prize or from defeating all three opponents during a slots machine challenge.
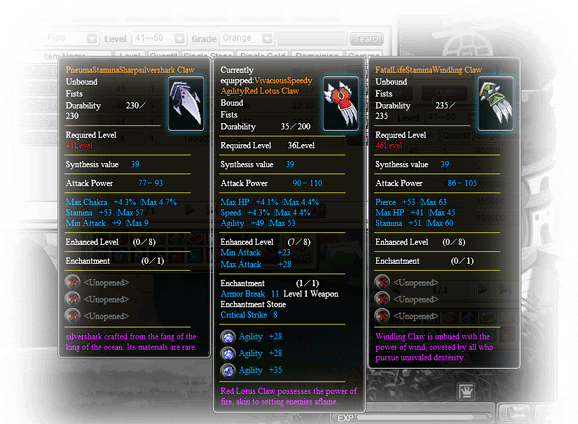
Tip: Save your enhancement talismans until you are level 16, 26, 36, 46, etc.. you can use a newer weapon. Use your enhancement talismans on it and you’ll end up having a higher attack than the next tier weapon. Level 36 weapon enhanced 7 times has 90-110 attack while a level 41 originally has 77-93 attack.
1.2.2 – Refine
This allows you to change the stats of an equipment using a [Refining Talisman] or spending 8 gold/gift coupons. It’s handy when you don’t like the stats on your equipment and want to get better stats. It may be costly by using gold/gift coupons, but I personally think it is worth it to get stronger.
1.2.3 – Enchantment
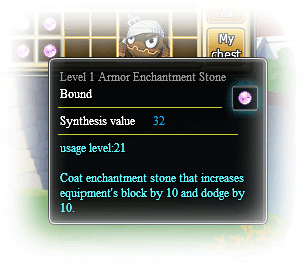
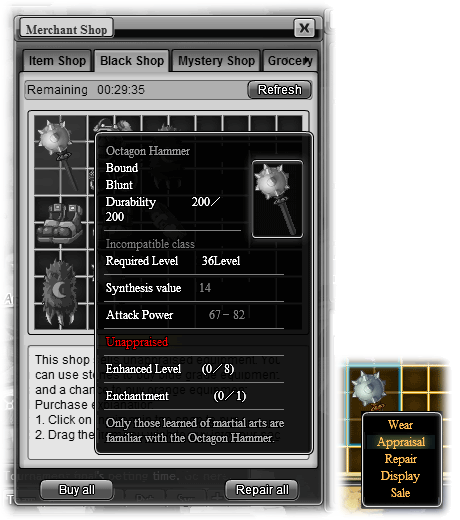
Enchanting items may give you a tough start. There are many different enchantment stones for Weapon, Accessory, Top, Armor, and Bottom. They are all pretty straight forward but [Bottom Enchantment Talisman] can be used for the belts or boots.
There are different levels for enchantment stones. Level 1 enchantment stones are for equipments level 21-30, level 2 is for equipments level 31-40, etc. Although the item description says usage level: 21 (see picture below), it really means that it can be used for chest armors that are within level 21 to 30 or third tier.
This is how I like to think of the equipment levels:
First Tier: Level 1 to 10
Second Tier: Level 11 to 20
Third Tier: Level 21 to 30 … and so on.
1.2.4 – Create Slot
You can create slots into your equipment using a [Slot Creation Talisman] which can be obtained from Collecting Foreign Matter quest from Reward Quests (located in the village).
For weapons, you can have a max of three slots and only one slot for armor. Creating slots in equipment allow you to embed gems into the equipment, adding a bit more stats. You can obtain gems from the explorations or from the item mall. To embed a gem onto an equipment, you drag the gem onto the equipment (in your bag) with an open slot, it is free! To remove a gem, there’s a ‘Remove’ tab in the Armory and you can separate your equipment and gem by spending gold. Your equipment and gem will not be deleted, just separated and you will still have an open slot in your equipment.
If you look at most people in the Role Rankings, you see most of them have embedded gems so it’s a very good idea to embed gems.
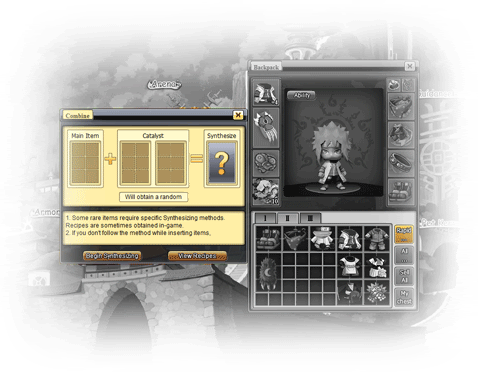
1.3.0 – Synthesis
You can start synthesizing at Level 15. There is a button in your bag called Rapid … which will open the Synthesis window. Synthesizing is used in various ways to acquire, update, change a type of item. It may be random, but others are currently figuring out a theory behind synthesizing.
1.3.1 – Synthesis Formulas
Visit Setry’s thread for a vast list of formulas which come in handy when synthesizing.
1.3.2 – Notes
As you have probably known, each time you synthesis (whether fail or success), you have to pay an additional 10 stones which accumulates. But after the server resets each day, it’ll reduce back to 10 stones on the first try, then 20 stones on the second try, etc.
Also be cautious as to what you’re putting in the Main Item and Catalysts. If you want an equipment as the final result, put your equipment in the Main Item and random items with the proper synthesis value in the Catalysts. When you click on the Synthesize button, it’ll warn you if you are doing an incorrect formula for synthesizing. However, most of the times, it will not because the system does not know what type of item you want as a result (maybe a gem or an item).
For outfits and pets, if you fail a synthesis, you will only lose your catalysts. Your main item will remain the same.
However, if you use equipment and fail the synthesis, it will give you the same color of equipment but different item. For example, if you do 2s + 2s + 2s and fail, you will be returned a 2s item of another kind.
If you wish to have an unbound item as a result, you should use all unbound items. If you have even one bound item in your synthesis, the result will be bound.
Note: You can get unbound items from Item Mall (pay gold), Valhalla Camp, Trade Market, Slots Machine, and demons in various maps.
1.4.0 – Merchant Shop
This is my most favorite and used place in the game. I’ll tell you why as you read on. You can buy either equipment or grocery food here. There are four sections: Item Shop, Black Shop, Mystery Shop, and Grocery.
Note: You can repair all your equipment at once using the Repair all button at the bottom right to save time.
1.4.1 – Appraisal
Equipment you buy in the Black Shop and Mystery Shop are all unappraised, meaning they have a synthesis value of 14 and have no stats. In order to use these equipment, you must appraise them by clicking on the equipment and choose ‘Appraisal’. These equipment are unique in each shop because they may give different class equipments such as gray/blue/orange/gold.
1.4.2 – Refresh
This button is located at the top right of each shop. It refreshes the shop with a randomized set of equipments. Refreshing takes about 30 minutes but if you want to instantly refresh, you can spend stones (roughly 100 stones).
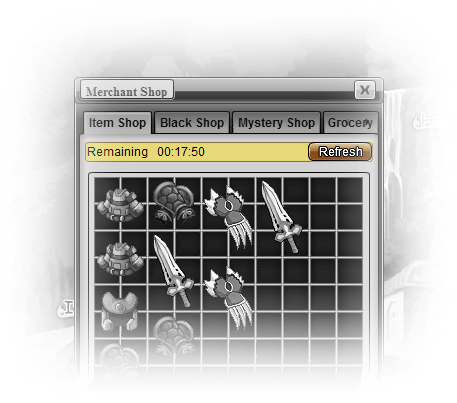
1.4.3 – Item Shop
In the Item Shop, you can buy appraised equipment for stones: low. You can only buy gray (14) or blue (22) items here. The price is really cheap around 200 stones per equipment.
Tip: Buy blue (22) equipment here for synthesizing (see 1.3). I normally buy the blue (22) equipment when I want to change my orange outfit. The synthesis formula for this is: Orange + Blue(22) + Blue(22) = Another Orange. If the item shop runs out of equipment with synthesis value of 22, you can refresh the shop by spending stones (see 1.4.2).
1.4.4 – Black Shop
In the Black Shop, you can buy unappraised equipment for stones: high. The price is in the three digits area. Upon appraisal, you may obtain a blue or orange equipment.
1.4.5 – Mystery Shop
In the Mystery Shop, you can buy these unappraised equipment for gold. Upon appraisal, you may obtain a blue, orange, or gold equipment.
1.4.6 – Grocery
In the Grocery, you can buy HP/Chakra potions and food (hunger level: 5). The food are not worth much in hunger level but they have significance when feeding your pet in the Pet Kennel (see 1.1.2).
1.5.0 – Trade Market
The trade market is a very popular place among players. At level 25, you can start to use this feature. To access the trade market there’s a bar with eight buttons at the bottom right of your screen. The trade market button is the second button from the right (looks like a cat icon).
There are different functions within the trade market: Buy Item, Purchase Item, Consign Item, Sell, Buy, and Trade Warehouse.
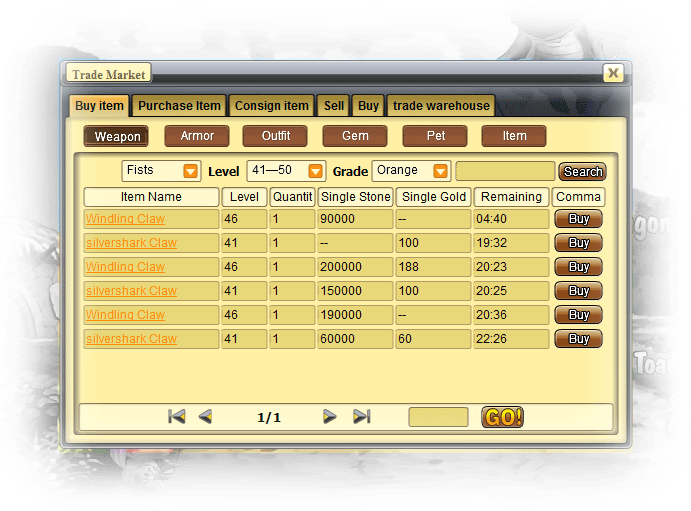
1.5.1 – Buy item
This is the place where players sell their items/equipment for others to buy.
If you see items that have a value under Single Stone or Single Gold, it means you can pay with one of these currencies. Take a look at the picture below. For the third Grimmjow listed, you can choose to buy it for 50000 stones or 50 gold (gift coupons are not accepted).
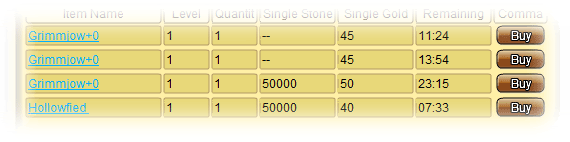
Warning: Avoid scams! Watch out for players who over-price cheap items by adding an extra 0 in their stones (or doing something like 49999 which may make you think it’s 4999). In some cases, they are just over-priced and unintentional scamming.

1.5.2 – Purchase item
This place is for players to request an item. In other words, people sell you the item after you set a price for it.
1.5.3 – Consign item
In the Consign tab, you can find out the remaining shelf time that’s left for your item. You can choose to remove your consigned item from the shelves whenever you want. If your consigned item is not bought within the selling time, you can retrieve your item by clicking ‘Stored’. Also, you can retrieve your item during the selling time by clicking ‘Withdraw’ and then ‘Stored’. After you click ‘Stored’, your item will be stored into the Trade Warehouse and you can claim it from there.

There is also a button called ‘Display’ where you can [System] announce your item that’s being sold into the chat by spending 2 gold. I’d recommend just typing in a message saying you are selling your item since you do not have to spend gold. But the display message allows people to see what the description and stats are for the consigned item.
1.5.4 – Sell
If you head to the Sell tab, you are able to see all the items you can sell. These items are unbound. You can keep it on the shelf for 8 hours, 12 hours, or 24 hours. The more time you want, the more stones you must spend to put it on the shelf.
If a player has bought your item, you would earn 90% of the money (10% deducted for tax) and it would be stored into the Trade Warehouse. For example, if you sell your item for 20,000 stones, you will get 18,000 stones (10% of 20,000 is 2000).
Note: You can sell up to five items a time.
1.5.5 – Buy
The Buy section of the Trade Market is where you want to request an item. However, you cannot request weapons/armors. It works by placing the price you wish to buy the item for. The system deducts your money and puts it into the trade market temporarily until someone sells the item to you.
To cancel your purchase request, is similar to the functions (store, withdraw) in the Consign tab. However, when you click ‘Store’, you get your money back.
1.5.6 – Trade Warehouse
The Trade Warehouse is like a storage. It stores your items/money after you click ‘Storage’ in either the Consign tab or Buy tab. The money you receive from selling an item is directly stored into this section. You can simply click ‘Claim’ to deposit it.

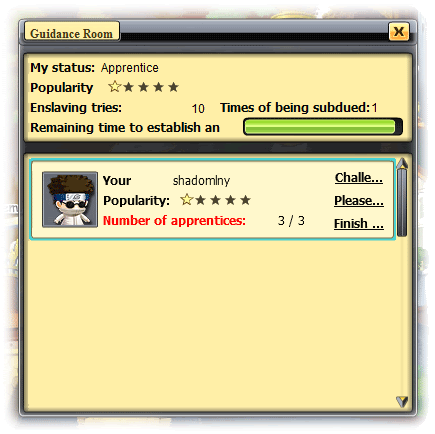
1.6.0 – Guidance Room
At level 18, you can start having your own apprentice (or master). This room manages your apprentices/master where you can ‘please’ them for EXP.
1.6.1 – Capturing an Apprentice
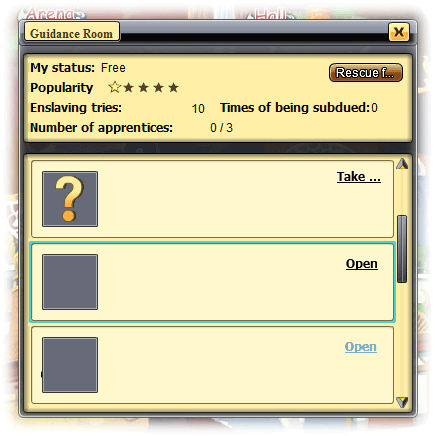
You can get apprentices from defeating players level 18+ in the arena and if players steal one of your apprentices (their character will show up in the ‘Take’ window). But if you defeat them in the arena, they are not yours on the spot. You can go to Disciple at the bottom in the arena or go to Guidance Room in the village and you’ll see something called ‘Take’. Clicking on this will allow you to view if the person you defeated is a master or an apprentice. If they are an apprentice, you have to defeat their master to get him/her. On the other hand, if they are a master, you can only take one of their apprentices. Sometimes, players are free which means they are neither an apprentice or master. If you defeat them, you can make them your apprentice.
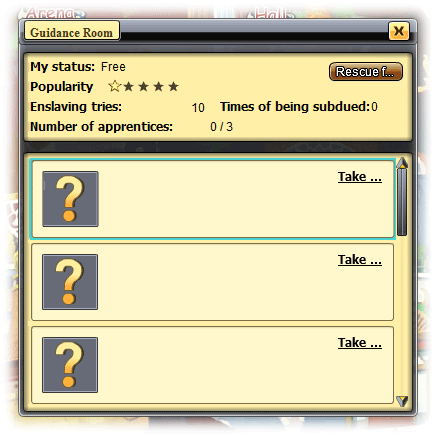
You can ‘Open’ more apprentice spaces in the Guidance Room if you have a specified amount of [Apprentice Column Opening Book] which is obtained from the card flips in the arena.
Note: There is a limit in how much challenges you can do for attempting on snatching an apprentice. The number of tries is located at the bottom right of window when you click on ‘Take’.
1.6.2 – Master
For masters, you can have an apprentice up to 3 days. During these days, your apprentice accumulates EXP automatically and once the three days are over, you will receive the EXP. Some players might also challenge you and steal your apprentice. But you gain the EXP they have accumulated during the time they were your apprentice. You get mail notifications when someone tries to steal your apprentice.
Each day, you can ‘Teach’ an apprentice. This will give you a fixed amount of EXP. You can do this for each apprentice per day.
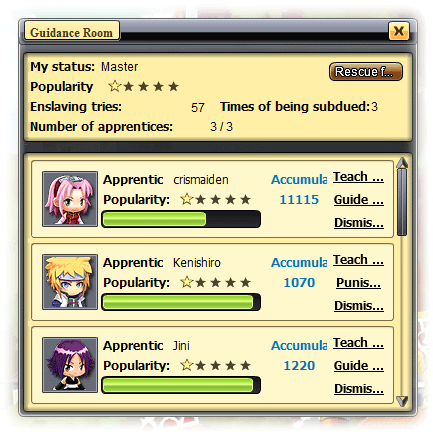
Benefit: You can use your apprentices’ character in Valhalla (even though they are not online). However, to use your apprentice in the stage, your apprentice cannot be 11 levels higher than the stage level. For example, Endless Sea Forest is for level 26+, so your apprentice can be level 27, 28, 29 … 36. If the apprentice is level 37, the system will not allow your team to enter.
1.6.3 – Apprentice
Information to be added at a later time.
1.7.0 – Slots Machine
The slot machine is located at the top left corner of your screen (under your character photo) in some maps. You first experience the slots machine at level 16 in Crossroads where you can team up with others from different villages. Slot machines means exactly what it is. You can pull the rod and win! But to use the rod again, you have to wait 1 hour. Although, to refresh the slots again, you can challenge the three opponents by clicking on Start Challenge in the slots machine. You can choose to go by yourself or fight with 2 other players. If your team wins, the slots are refreshed.
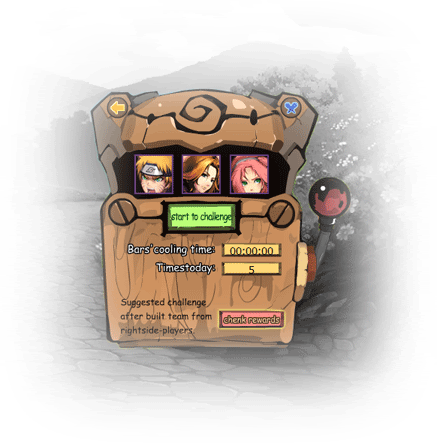
The opponents’ level is the same as the Entry level of the area. You can check by going to World Map and putting your mouse over that specific area.
1.7.1 – Prizes
1st place (Senior Avatar Gift) : Naruto + Sakura + Sasuke
2nd place (Avatar Gift): Same character 3x (i.e. Gaara + Gaara + Gaara)
3rd place (Exquisite Gift): Same character x2 (i.e. Gaara + Gaara + Ichigo)
Senior Avatar Gift: Orange or blue outfit
Avatar Gift: Blue or gray outfit
Exquisite Gift: Enhancement Talisman, Hand Grenade, or Anonymous Name Card
Note: They can be in any order. You can have Sasuke + Naruto + Sakura and still get first prize.
1.7.2 – Items
You may be rewarded with items when your team wins against the three opponents. The slots machine at Crossroads (16) and Eerie Passage (26) give you bound items.
At level 31+, you are able to receive unbound items from the slots machine. The first slots machine that gives you unbound items is Dawning Wilds (31). You can choose to synthesize, use, or sell them. You can only receive 2s+ items at the slots from now on.
1.7.3 – Team Stone
In order to begin a challenge in slots machine, you and your team must have full health to start. Otherwise, it’ll pop-up a message saying a teammate’s HP is not full.
Every map with a slots machine has a Team Stone which is used to heal your health and chakra (much like the village lounge). Of course, it costs around 100 stones (Team Stone => Enter Lounge => Restore HP and Chakra).
1.7.4 – Party
Do you want teammates? Have no fear! There’s plenty of people in one of those slots machine maps. There is a way to find teammates (Team Stone => Enter Team Organization Stone). If you are already a team leader, you can go to the Team List tab and ‘Request teammate’ at the top left. If you don’t have a team, you can go to the Team Request List and ‘Request team’ at the top left. Be patient! If you leave the map, you will have to request again.
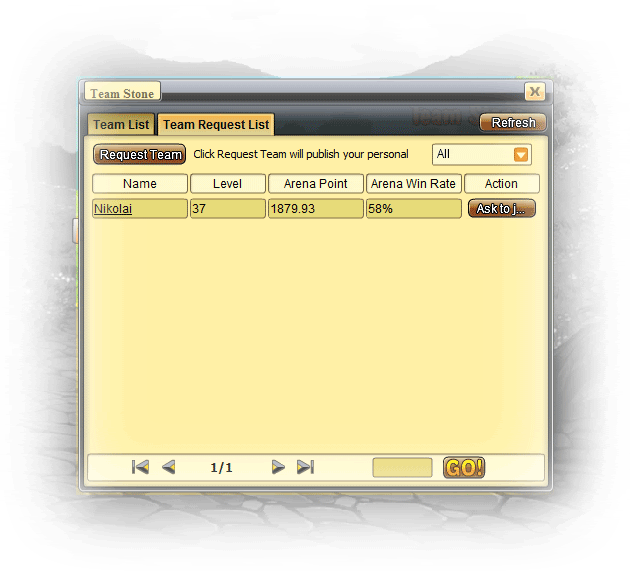
You can check by clicking on a little icon at the bottom that looks like two buddy icons. Click that, and it’ll display players in the map you are in as well as your friends.


Recent Comments