Metal Assault Strategy Guide
Metal Assault Strategy Guide by Virtus90
Once I played this game for a while, I found there were a lot of questions coming to mind and no place to go to figure them out. For anyone who has these questions or want some helpful tips to maximize their experience, here’s a strategy guide to help you on your Metal Assault journey. I will be updating this as the game evolves.
Also, if you’ve made an additional guide, and you want me to link it here, let me know. (in a PM if possible)
Contributors: xiMiguelx (supply boxes image), inevibility (medal value info), darksaiyanis (skill point info), Eryth (supply card info), SirLazarus (clean up), rezakon (upgrade info), sixetynine (mailing system, Company Info)
I realize this guide is massive, so I’ve included a table of contents for you to look over if you need specific info. If you don’t feel like scrolling down, you can hit Ctrl+F on your keyboard and find what you’re looking for that way.
_________________________________________________________________
Contents:
- Point Systems
- Weapons
A: Weapon Upgrades
B: Licenses - Inventory
A: Sort Items
B: Backpack Storage
C: Destroying Untradables - Item Classes
A: Normal/Common Items
B: Unique/Uncommon Items
C: Rare Items
D: Special Items
E: Honor Shop Items - Missions
A: Fatigue System
B: Mission Requirements
C: Revive Tokens
D: Mission Rewards - Company Information
A. Stars/Titles - Combat Situations
A: Shields/Protection
B: Suggested Weapons Usage - Other Information
A: Opening a Store
B: Calling a Kick vote
C: Switch Chat type
D: Quick Messaging/Commands
E: Player Titles
F: Completion rewards
G: Mailing System
_________________________________________________________________
—1. Point Systems—
HP (Health/Hit Points): These represent how much health you have and how much damage you can take before death. The more health you have, the more damage you can take before dying. If you’re running low on HP, use a Med Kit, Combat Ration, or your active Recovery skill (costs MP) to regain health. For emergency situations, use a Med Kit and Recovery together.
MP: These represent how many times you can use skills. Varying skills and levels of skills require different amounts of MP. If you run out of MP, use a Water Bottle or wait for the passive Meditation skill to fill it up again.
SP (Stamina Points): These represent how much stamina your character has. Stamina is used by activating the Dash skill or by using Snipe Mode. The more you Dash or the longer you stay in Snipe Mode, the more SP will be used. SP is automatically regenerated when not in use. The Endurance skill can increase the amount of SP per second that is regained.
SKP (Skill Points): Skill Points are acquired by ranking up and getting new license levels. Talk to Steve the Instructor in the Military area to assign skill points. Also note there are ‘Active’ and ‘Passive’ skill tabs available. Active skills are skills that can be assigned to a hotkey and used in game. Passive skills are skills that are always on and cannot be assigned to a hotkey.
Honor Points: Honor points can be acquired in many different ways.
1. Staying logged in for 10 minutes will award you with one honor point.
2. Headshots and multi-kills in PvP modes such as Deathmatch and Team Battle also grant Honor Points. The more kills you rack up, the better your ending Honor Point gain will be. Honor Shop supply boxes are rewarded with higher kill levels.
3. Old/Blue/Gold Medals found in supply boxes are worth Honor Points. Old/Blue/Gold Medals can be sold at the Honor Shop (the one with the Medal on the door). Old medals are worth 10 honor points, Blue medals are worth 200 honor points, and Gold medals are worth 500 Honor Points.
_________________________________________________________________
—2. Weapons—
Damage: The higher this number is, the more damage it will do to another player or enemy in mission mode.
Rate of Fire: The higher this number is, the faster the weapon can be fired. (The delay between shots is reduced)
Range: The higher this number is, the farther your shots will travel before disappearing.
Accuracy: The higher this number is, the more accurate your shots will be. (Bullets won’t spread out as much, sniper rounds and rockets will travel straighter)
Bullet Speed: The higher this number is, the faster your shots will travel to their destination.
Mobility: The higher this number is, the faster you will move when using the weapon.
Endurance: This number lowers whenever you use the weapon for an extended period. You can tell a weapon has lowered Endurance by an orange highlight:
If endurance reaches 0, the weapon will break. Armor also has endurance and will be destroyed if endurance reaches 0. Currently, the endurance system is disabled.
To increase weapon endurance, you need to repair your equipment. Repairing equipment costs coins. This can be done by visiting B. Rokin in the Town Square area, or by going to the Repair option in the game lobby in the corner:
You can either choose to repair all of your equipped items, or individual items of your choice.
Weapon Upgrades:
Weapon upgrades will increase weapon stats. A weapon can be upgraded by talking to B. Rokin in the Town Square area.
Upgrades require coins and get more expensive depending on the level of the upgrade. Upgrades are not guaranteed to succeed. Level 1 has a 90% success rate, level 2 has an 80% success rate, level 3 has a 70% success rate and so on.
If an upgrade fails, the upgrade materials are destroyed. Failing upgrades beyond Level 3 have a chance of the following side effects:
-Previous upgrades in the category will be removed
-All prior upgrades will be removed
-The weapon will be destroyed
The bad side effects are completely random. Including an Amp (see below) will not effect the chance of side effects as a result of a failure.
Also, upgrades cannot be assigned until a prior level of upgrade has been applied. (You can’t put a Level 2 upgrade on an item that hasn’t received a Level 1 upgrade and so on)
As of Open Beta, there are six types of weapon upgrades.
Barrel:
The Barrel upgrade is available from levels 1-5 and will increase weapon Range.
Bolt:
The Bolt upgrade is available from levels 1-5 and will increase weapon Bullet Speed.
Spring:
The Spring upgrade is available from levels 1-5 and will increase the weapon’s Rate of Fire.
Trigger:
The Trigger upgrade is available from levels 1-5 and will increase the weapon’s Accuracy.
Amp:
Amps are special items that further increase the bonus an upgrade grants. This upgrade bonus is a random number indicated by the Amp. For example, if an Amp has a number between 1 and 3, you will either get 1, 2, or 3 added on to your weapon stats if the upgrade succeeds. Amps cannot be put on a weapon without using another upgrade like a Trigger or a Bolt. If the upgrade fails on the weapon, the Amp is also destroyed.
Higher level Amps require higher upgrade levels. For instance, a level four Amp requires a level four weapon upgrade.
Mods:
Mods are items that improve the weapon in some way, whether that be a scope for long range fire, or additional ammo with extended magazines. Mods can be purchased in the item shop (jar on the door) under the misc column. Mods are destroyed when removed from a weapon. Completed mod sets (uncommon/rare mods) may grant additional benefits on the weapon.
To tell if an item has been upgraded, check it’s stats:
Upgraded items will show additional ‘Lv.’ markers dependent on how high the upgrade level is.
Licenses:
License experience is awarded through different actions, whether that be killing enemies in Co-op mode or other players in PvP combat. You’ll see an indicator above your head saying ‘License up’ if you kill other players in PvP. Co-op points are cumulative and won’t show until you leave the room. The ‘L’ key will bring up your license window (shown above) where you can then assign license points to different weapon classes. This allows for specialization in specific weapon classes.
The higher the license you have in a category, you better weapons you can equip. License levels increase from Rookie and up to Legend. ‘Max’ levels arrive at different intervals per level.
Always check the license requirements on weapons before you purchase them, especially from personal stores. If you don’t have the license or rank requirements, you won’t be able to use the weapon until you do.
_________________________________________________________________
—3. Inventory—
Sort items: For those of you who want to get the most out of your inventory slots, the ‘item sort’ button (shown below)
will automatically sort your items and stack multiple items up to conserve inventory space. Please note some items like untradables and items obtained from supply boxes won’t stack. The maximum stackable number of items obtained beyond your starting items is 10. Your ‘personal storage’ with Sing also has an inventory sort button at the bottom left of the window. Use the ‘Ctrl’ key to break up stacked items.
Backpack storage: Your backpack also contains additional storage slots:
If your inventory is full and you received an additional item, it may have been moved to your backpack. More expensive packs have higher numbers of additional inventory slots.
Destroying untradables: Just click on the item in your inventory to select it. Drag it off your inventory screen and onto the street. You’ll be offered an option to destroy the item permanently. This is handy for removing those items you can’t sell.
_________________________________________________________________
—4. Item Classes—
There are generally five different classes of equippable items as of Closed Beta:
Normal/Common Items:
Common items are highlighted in white. These items are obtainable through certain missions, or can be bought in the equipment and gun shops. These items are very readily available and obtainable.
Unique/Uncommon Items:
Unique items are highlighted in blue. These items are currently obtained through supply boxes, or as special mission rewards. Often, they are part of a set that grants special bonuses if you find more of the set items and equip them.
Rare Items:
Rare items are highlighted in pink. These items are difficult to obtain through any normal means. Usually, they are given for special events and can be found in supply boxes if you’re very lucky. They also grant special bonuses for certain mission modes.
Special Items:
Special items are highlighted in yellow. These items are obtainable through special events or through the Item Shop. These items are assigned to the ‘Skin’ section of your equipment slots and have expiration dates on them. Like Unique Items, Special Items can also come as part of a set and grant special bonuses if more of the set is equipped.
Honor Shop Items:
Honor Shop items are highlighted in purple. These items are purchased at the Honor Shop for Honor Points. Weapons in the Honor Shop typically require a high license level to use.
_________________________________________________________________
—5. Missions—
There are five difficulty levels of missions: Rookie, Veteran, Elite, Master, and Legend. Difficulty levels must be cleared in order. Once a level is cleared, the next one becomes unlocked. The first three levels (Rookie, Veteran, Elite) are available for clearing immediately. Levels four and five (Master, Legend) won’t be available until you clear all missions on the map on Elite.
The higher the difficulty level, the more numerous enemies are, and the more HP they have. Higher difficulty levels also grant higher supply card drops. (See Supply Cards)
Fatigue system: As of Open Beta, there is now a fatigue system that will effect your ability to play missions and co-op. This is shown by the purple ‘Cap’ bar above your stats in the lower left corner. Points are deducted from the fatigue bar after every mission or Co-op played. Once the bar reaches zero, you won’t be able to play missions or Co-op until it resets (6 am every morning, Pacific Time) or is refilled (unknown whether item shop will have a refresh item).
Mission Requirements: Some missions have requirements for you to fulfill before you can do them.
If you receive an error message stating you can’t do a mission, chances are you don’t meet the mission requirements. Make sure you have the correct number of people for the mission. In order to replay a previous cleared difficulty level, revive tokens are required (see below)
Revive Tokens:
Revive tokens are used to revive in mission mode, and to revive immediately in Co-op modes. There are two types of revive tokens; Silver, and Gold. Silver tokens are always used first when reviving during a mission or Co-op.
Each day you get 3 silver tokens, and after doing the tutorial, you have a total of 10 gold tokens (5 are given for tutorial completion). Silver tokens don’t stack up, and are limited to 3. Some boxes have a really low chance of giving you gold tokens as well.
As of Closed Beta, revive tokens are required to replay missions. Gold tokens are used for this purpose. The Item Shop will most likely offer the ability to purchase more.
Mission Rewards:
Medals:
Medals are dropped by enemies in mission mode. They grant additional exp at the end of the mission. (Medals are also dropped in Free battle PvP mode)
Supply Cards:
Supply Cards are dropped by random enemies. The chances of supply cards being dropped increases with higher mission difficulty. At the end of the mission, you will be able to pick from a selection of boxes at random.
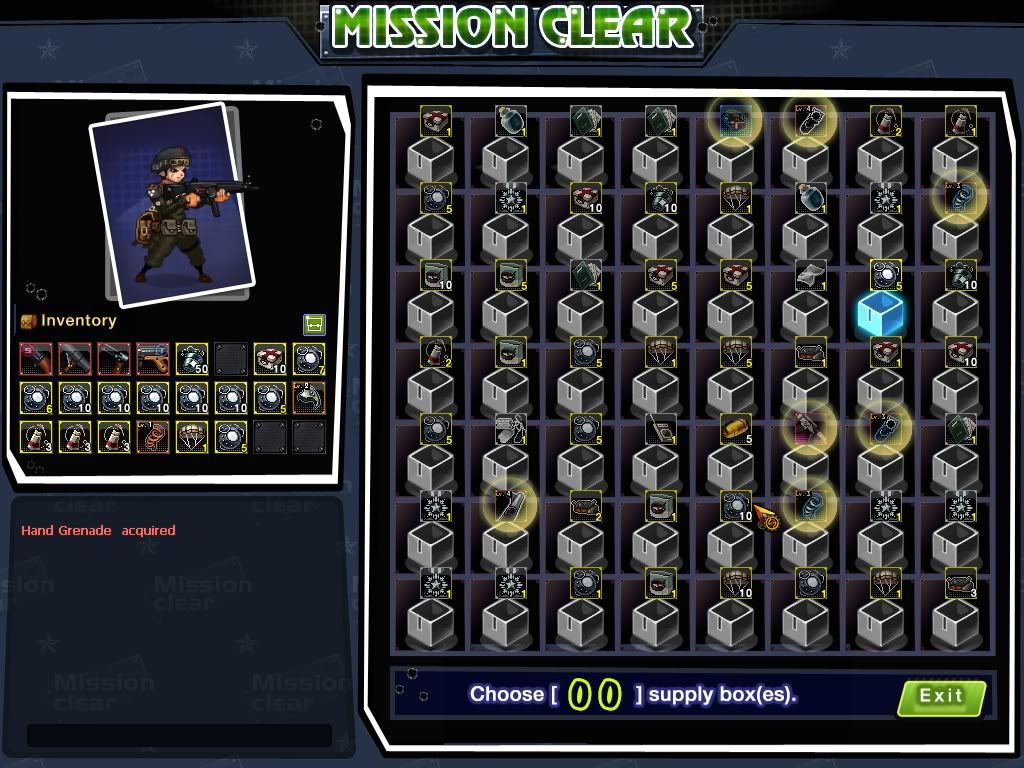
Anything from basic items to rare outfits can be found in them if you’re lucky. A-grade supply cards (orange supply cards) can also be found and used. A-grade supply cards give you a chance of selecting a rare item from the supply boxes. Often you’ll see a supply box with two items flashing in it. The A-grade supply card simply allows you to get the better of the two items if you’re lucky enough to pick it. Regular supply cards cannot be used to attain rare items.
_________________________________________________________________
—6. Company Information—
Did you ever wonder what those stars are above player names? You can obtain these stars by doing Company Battles and getting certain ‘achievements’ known as titles.
Here is an example of how they look in your company info section:

The different titles you can get and how to obtain them are:
 To obtain this title you need to be in the top 5 ranking in the company ranking, the ranking depends on how many points your company has.
 To obtain this title you need to have the most wins out of all the companies in the game.
 To obtain this title you must have the best win ratio.
 To obtain this title you must have the most kills of the game. NOTE: This title is glitched, every company that played a company battle will get it the next day but if they play a company battle it will disappear.
 To obtain this title you must have the most games played; and it doesn’t matter if you lose or win.
![]()
![]() To obtain this title you must have the highest number of members in your company.
To obtain this title you must have the highest number of members in your company.
_________________________________________________________________
—7. Combat situations—
Shields/Protection: Shields are given to low ranked players for protection and are found in the ‘Beginner’s Match’ area. There are three levels of shields which change based on your kill/death ratio and are removed completely once you reach staff sargent rank:
Novice = 50% damage reduction; must start the game under a new account for this shield level.
Intermediate = 30% damage reduction; requirements are unknown.
Expert = No damage reduction; requirements are unknown (may require a specific kill/death ratio before deactivating).
To play immediate matches without shields involved, click on the ‘Free Match’ button on the left side of the PvP lobby.
-Despite popular belief, mines cannot be destroyed with other explosives. Don’t waste a grenade or rocket on trying to blow a suspected mine spot. Unless you have the Detect Mines and Mine Sweep skills assigned, it’s best just to avoid that area and move on.
-Tired of those annoying ladder deaths? Ladder Shooting is a very handy skill to assign.
-Going prone is possibly the most important aspect of keeping yourself alive. Make sure your controls are configured to go prone. By default, the prone option is assigned to the right ctrl key. Being prone also reduces the chance of critical hits from your enemies.
-Buy lots of grenades. You may think after a while they’re not worth buying, but there will be certain situations where you’ll wish you had one. They’re most handy for spooking people from their camp spots and for temporarily blocking an entryway.
–SHOTGUNS AND ROCKETS LAG. Not everyone you hit with a shotgun or rocket will die instantaneously. On their screens, it may appear you didn’t even hit them. Don’t complain about not killing them and then calling them a hack.
—Suggested Weapon Usage—
Each weapon in Metal Assault is unique and requires a certain amount of finesse to use properly and effectively.
Pistols: Pistols are your backup weapons. They can be selected even while reloading another weapon and used for quick defense in tight situations. Don’t try to be a hero using a pistol. It’s not a primary weapon by any means, and unless you’re trying to get a title with it, it’s not worth getting yourself killed over. Damage is the most important stat in a pistol. All pistols have a terrible rate of fire, so each bullet makes a difference and any damage you can do to fend off an enemy will be worth it.
Rifles: Rifles are very important and versatile weapons. They can be used in most any situation. When getting up close to an enemy with a rifle, roll or go prone to throw them off. Most enemies will miss when this tactic is employed. You may get hit a few times, but you’ll live. Damage and rate of fire are the most important factors of a rifle. Generally any rifle you can get with high damage (anything above 65) and decent rate of fire (anything above 60) will be your best friend. Guns with higher rates of fire usually have lower damage and vice-versa. Accuracy and range can be important factors as well, depending on your style of play.
For more in depth coverage regarding Rifle strategy, visit BROADFIELD’s rifle tutorial
Sniper Rifles: Sniper rifles are powerful single shot weapons. Camping on high areas or behind cover like bushes tends to produce great results when using snipers. Depending on the map, using cover when using a sniper can allow you to rack up a lot of kills. Camping at the end of hallways also produces great results. Simply watch the doorway on the other end and pop any one who comes through while going behind cover if available. This strategy can be incredibly effective when implemented properly. Always go prone if you can. It makes you a lower profile target and makes you more difficult to hit from enemy snipers. Rate of fire is the most important stat on a sniper. The more shots you can pull off, the better. Damage is negligent in this case. Any sniper above 70 damage is probably going to give your enemy a bad day, and even more so if it has a high rate of fire. Bullet speed is also very important for snipers, especially when scoped out to long distances. It can be incredibly frustrating if you fire a shot on target and your enemy dodges it due to a slow bullet.
For more detailed info regarding snipers, visit BROADFIELD’s sniper tutorial
Shotguns: Shotguns are powerful short range weapons. Typically, the strategy with shotguns is to get up close and hit them with everything you’ve got; the closer the better. Shotguns spread out with three rounds, and making each of those hit is imperative. Rolling and dodging when close to an enemy can give you enough time to hit them. Damage is obvious with shotguns; the higher the better. Rate of fire can be handy, but isn’t a necessity. High range and accuracy shotguns can be employed in different strategies, with some damage sacrificed. These types of shotguns can be used very effectively as well.
For more in depth coverage regarding shotguns, visit BROADFIELD’s shotgun tutorial
Rocket Launchers: RL’s can be very fun or very annoying depending on how they’re used. At times, you may end up blowing yourself up more than the enemy team if you’re not careful. As with snipers, rocket launchers are slow to reload but do a ton of damage. Employ similar strategies as you would with snipers. Hallway camping can produce great results, but make sure you have an escape route planned in case you didn’t connect. RL’s are very slow to reload and can get you killed if the rocket didn’t hit. Most enemies know you’re vulnerable after reloading. Placing mines around you can help cover your escape if you’re being chased. Rockets can cause enemies to back up and provide your team with a few seconds to charge in and wipe them out. Damage isn’t as important as you’d think. High bullet speed and range are actually the most important stats when dealing with RL’s. As with snipers, higher damage usually means slower bullet speed, and the same applies to the ‘anything above 70’ rule for snipers. Rocket launchers can be just as effective as snipers when implemented properly, with the explosion radius being a plus.
For more info regarding rocket launchers, visit BROADFIELD’s rocket tutorial
Grenades: Grenades are highly important in combat. Most characters have the ability to increase their grenade handling efficiency in some way, and there’s a reason for that. Grenades can help clear out camping enemies and make them back up rather far depending on how close you got it to them. They’re used more for the ‘scare’ factor, but you can get great multi-kills with them as well. If an enemy is charging you and you’re not prepared for what ever reason, throwing a nade in their direction can usually buy you enough time to get into position.
Mines: Mines can be nasty and frustrating to the enemy when used in large groups. Most enemies don’t bother to enable their Detect Mines or Mine Sweep abilities, which means easy kills for you. Just drop a mine or two in narrow choke points or hallways, and it’ll make your enemies think twice about going through there again. Since mines were nerfed, it takes two of them to kill an enemy. Mines have a slow cool down time, so you can’t make a mine field in a matter of minutes. You have to plan ahead with mines. Put them in areas where you know people go through often. Be careful when planting mines, they make you very vulnerable but can be cancelled if you need to fight. This will cost you the long recharge time.
Tanks: Tanks in general are easy to operate; just roll over and blow up enemies as you see fit. Tank controls won’t be listed here, you should learn those in your first few missions. The only thing you have to worry about when operating a tank are rockets and AT mines, the latter of which are rarely ever used. When an enemy fires a rocket at you, press ‘f’ to get out and roll away immediately. Depending on the experience of the enemy, you may still get nailed if they aimed low, but normally you’ll survive and be able to use the tank again.
Robots/Mechs: Mechs can be troublesome to the enemy. They can jump very high and avoid most type of attacks with ease. The downside to this is that they’re vulnerable to all types of weaponry, with the exception of pistols. Mechs don’t kill instantly like tanks either, as they require sustained fire to do any type of damage. You can’t run people over when using a mech either. The plus side is that they have a very high range and can keep up sustained fire on an area for quite some time before running out of ammo. This is handy for keeping narrow areas in check and pushing back enemy charges. Mech pilots are generally short lived as well, so don’t expect massive kill streaks.
Gunship: The gunship is the only flying vehicle you can use. It has weaponry similar to the mech, and fires rockets from the secondary position. This can make for a deadly combo if your co pilot knows when to react. Gunships are mostly used for harassing enemy positions and complicating enemy movements. The confusion created from a gunship can be invaluable to ground troops. Rockets, tanks, and artillery are the only things you should worry about when using a gunship. To compensate for this, don’t fly too low or hang in an area for too long. You’d be surprised how easy it is to hit a gunship with an artillery or tank round.
Artillery: Artillery is the long range powerhouse of the vehicle class. Firing from long distances, artillery can be unnerving to enemies, especially when the proper angle and power is determined. A good artillery operator can keep sustained fire on an enemy position for the entire game, unless the enemy makes a good push forward. Artillery isn’t a necessity though, so don’t become dedicated to it. Depending on the map, artillery can be vulnerable to sneak attacks from rockets and tanks. The same rules apply to artillery as they do to tanks, press ‘f’ to bail out and roll away if in danger.
_________________________________________________________________
—8. Other Information—
Opening a store: In crowded areas you’ll often see people with hovering boxes over their heads that will say different things. Clicking these boxes will open a store window. You too can also open a ‘personal store’ by going to the item shop (the one with the jar on the door) and navigating to the ‘misc’ column. There you will find a personal store license that allows you to open a store. Please note that you’ll only able to open the store in the Square area (the one with the fountain) and that you won’t be able to move or browse other stores once you’ve opened it. The store license is a one time use, so when you close the store or you run out of items, you won’t be able to open it again until you purchase another license. You can modify store contents without requiring another license however.
Calling a Kick vote: To call a Kick vote, press Backspace on your keyboard and press the corresponding number keys to find the player you want to kick and the reason why you need to kick them. Kick votes can only be called once every 10 minutes per player.
Switch Chat Type: If you get a whisper, you can switch your communications from Normal chat to Whisper by hitting Tab when the chat window is open. If you want to Whisper a particular player, type their name in the Whisper chat and then the message you want to send.
Quick Messaging/Commands: Quick messages are messages you can send with the push of a button and can be used to relay commands to your team. Quick messages can be changed by clicking on the menu button at the bottom right of your screen and then clicking on the ‘Quick message setting’ button. Quick messages can be sent by using the ‘F’ keys at the top of your keyboard (F1, F2, F3, etc)
Player Titles: As the game progresses, you’ll start to see more people with ‘titles’ above their names. These titles can be found and awarded based on different criteria. To find the title achievements, press the ‘U’ key to go to your character page and click on the ‘Title’ button above your character:
100% mission complete reward: Once you complete a mission area 100% (indicated by the achievement rate at the top of the mission selection screen) there will be a bonus selection box that will appear next to the achievement rate. Click this box and you will be given a random award box.
Co-Op mission reward: If you complete any Co-Op mission mode, you’ll be rewarded with several boxes. Clicking on one of the boxes will give you a random number. If your number is one of the highest three, you’ll win a random award box.
Mailing System: The Mailing system is available to all users and can be accessed by clicking on the red mailboxes that can be found in all areas of town. Sending a message is easy, just type in the name of the recipient, the title of the message you want (optional) and the message itself. Please note, message bodies cannot be left blank. You can also send items and money to other players, which costs coins. The more valuable the item, the more expensive postage will be. For instance, a normal item may cost 50-100 coins to send whereas a Gold Medal costs up to 16k.
To tell if you’ve received mail, check for the green blinking indicator at the bottom left of your screen above your characters picture:
Clicking on this green button will open your mailbox. You can check mail by clicking on the message and then clicking on the ‘Check Mail’ button. This will open the message:
Depending on the message, you may have received parcel mail or coins. You can receive these items into your inventory by double clicking on the icon of the item or the amount sent respectively.

Recent Comments