The West Getting Started Guide
The West Getting Started Guide by Cpt. Marryat
I’ve been getting so many telegrams requesting tips on the best strategy to start (for reasons unknown), that it almost developed into a guide just through the additions I made each time I sent it to someone.
So I decided to just write a formal guide on ‘the first steps’. So here goes…
Hopefully by now you’ve worked out enough to Register an account and Log in, but now what?
Questing:
Questing is by far the easiest and fastest way to both learn the game, and upgrade your character at the same time. In order to begin your first quest, click ‘Quests’ which can be found 4th in the menu in the top-left of your screen as shown below:

The following screen should now be open:

Notice the exclamation mark above ‘Henry Walker, the Barkeepers’ head? That indicates that a new quest is available. Click on him to find out what he wants.

As is shown above, there will be a quest named ‘Introduction’ presented. Click on that and you should now see a description of the quest…

Don’t worry, it’s not hard… in fact if you cannot pass this one, then I suggest you simply give up on life (its only requirement is that you click ‘Complete’). Anyway upon accepting it you will receive the message:

Now click ‘Complete’ (which should be in the same place as ‘Accept’ was) and you’ll get another green message as follows:

Close the ‘Saloon’ using the ‘Triple ‘X’ button in the top-right corner.
Hint: The ‘Triple X’ closes all windows including those minimized, the ‘Underscore’ minimizes your current screen to the bottom of the page, and the ‘Single X’ closes your current window.
Congratulations! You’ve just successfully completed your first quest and received +1 experience for doing practically nothing, proud? I thought so.

You may have also have noticed that your yellow ‘Experience’ bar featured at the top just right of your ‘Profile Picture’ has increased slightly as well:

The topmost, and red coloured bar indicates your life which you may lose through duels or high risk jobs, however can recharge at your nearest Town.
The second blue bar outlines your energy or endurance as it is sometimes also referred to. Energy points show if the character is tired or not. You cannot work all day and all night, at some point your character needs sleep, preferably in a hotel. For every 10 minutes worth of work you perform, 2 energy points will be drained. However it will also recharge at a rate of 3 per hour or 4.5 for a paid account, and even higher if you are staying in a hotel room available at any nearby Town (the number of points regenerated depends upon the quality of the room); however this will cost money unless you sleep in your own Town.
Finally the 3rd bar reflects your experience points in contrast to your characters next level. You begin on level 1, and require 14 experience points to reach level 2 (of which 1 you have already earned). Experience can be acquired through either quest bonuses or in return for performing jobs.
The following few quests are similar in that very little thought or effort needs to be put into completing them. Simply return to the Saloon again and speak to whomever appears to be requesting your services (indicated through the yellow question or exclamaition marks previously mentioned), and follow the steps.
Equipping Items:
However soon you will come across the ‘Clothing’ quest as shown below:

Accept the quest as you have done before, and close the window. Now go to the menu in the top-left corner of your screen, but this time click the third option labelled ‘Inventory’.
A screen should popup as follows:

Click and drag the ‘Gray Rags’ across and into the box on the left representing your torso as shown below:


Well done, you are now wearing the Gray Rags. They will provde your character with a +1 point bonus to the ‘Setting Traps’ skill. You might also want to do the same with the ‘Gray Ragged Shoes’ and equip them into your character as they will provide you with a +1 point to ‘Repairing’.
Throughout the game you might find any number of different items that will provide you with a variety of bonuses. To equip them, just return to your inventory.
Employment:
Now comes the fun part where you’ll find yourself battling again often seemingly impossible odds… ‘Employment’.
The first quest requiring such an activity be performed is called ‘Pick Tobacco Leaves’ and demands that you go out and find yourself 1 ‘Tobacco Leaf’.
The first thing you’ll need to do after accepting and closing the quest window of course, is to open up the minimap available via the third option of the three available in the bottom-left of your screen (represented by a globe showing the Western hemisphere) as shown below:

The first one showing a cowboys head will centre your main screen onto your character, while the second will do so onto your Town (once you are a member of one).
Anyway once opened, select from the list on the right the job you are looking for (in this case ‘Picking Tobacco’ obviously) and it will highlight itself on the map in light blue as shown:

Click on the dot nearest to yourself (represented by the yellow dot) and your main screen should zoom in onto that location…

Click on the icon and the following screen should open up:

From here you can view quite a bit of information concerning the job at hand.
On the left can be seen an icon with a certain percentage underneath it (in this instance it reads 100%). This defines the lickelihood of your discovering an item per 30 minutes of work; as it is 100%, you will get an item for every half an hour your here.
In the top-right corner shows five bars labelled:
Wages – Shows the amount of money can be earned through working this job.
Experience – Similar to wages, however shows that which can be earned towards experience.
Luck – The higher this is, the better ‘found’ items may be.
Danger – The higher the danger, the greater risk there is of attaining danger when working on this job.
Motivation – If you work here too long, this will fall and so will your productivity.
…And finally along the bottom-left can be viewed the skills required to perform this job. Your total level of the skill’s shown needs to equal the difficulty of that job ‘plus one’. In this case the difficulty is zero, so you’ll only need to upgrade one of these in order to work here (ie. 0+1 > 0).
To begin work click ‘Ok’ in the bottom-right. A countdown timer should have appeared showing the time it will take to complete this task:

The small red coloured ‘X’ next to this enables you to cancel this acyivity if you no longer wish to complete it.
Following this first quest, you will be able to set the duration in which you work on a job by selecting from a list of either 10, 30, 60 or 120 minutes.
Dueling
At some point in the game your going to duel, so lets teach you the basics. Ok the first time your probably going to duel in the game is in a quest for the Barmen, and he asks you to kick double-faced Jules out of the bar. Read the hint at this point as it is very helpful, as it gives you information on where to aim at and which way to dodge. So lets show you the duel menu.
Right then on the left nav bar click ‘duel’ a window should pop up , like the one below:

As you can see there are different skills involved with Dueling, the main two are aiming and dodging. The higher the aim skill is the more likely you are going to hit and the higher the dodge level is the more likely your going to dodge or get less health taken from you. Other skills which are involved are, shooting, vigor, reflex, toughness, appearance and tactics. The higher the level of these skills are the better you are at dueling.
Vigor increases the amount of damage and how many times you land criticals with a melee weapon. Shooting increases the amount of damage and how many time you land criticals with a firearm. The skill for the weapon type you’re not using will turn grey. In other words, depending on the type of weapon you’re using, one of those skills will be completely useless during a duel.
The same goes for defensive maneuvers as well. Reflex lowers the amount of damage you take from your opponent if they are using a firearm. Toughness lowers the amount of damage if your opponent is using a melee weapon.
Aiming allows you to hit more often, while Dodging allows you to evade more often.
Appearance is the advantage your opponent has over you. The higher his Appearance stat, the more scared of him you become and the weaker your attacks are. This is when Tactics come in to play. They allow you to be familiar with the area you are in. In other words, even if your opponent is scary, there’s not much to worry about when you know your home turf like the back of your hand.
Tactics basically is the same as Appearance; the higher your Tactics, the less damage your opponent does.
OK dueling weapon also plays a big part due to it giving the damage, you can see a list of the weapons you can use to duel with HERE
Right then there are in total 8 rounds in dueling, in the first column on your dueling window you are selecting the aiming and dodging for the 1st and 5th round, as you can see along the top of the columns, second column is for 2nd and 6th rounds, third for 3rd and 7th rounds and the last column for 4th and 8th round.
Ok enough rubbish lets get on with the aiming! As you can see there are 5 places to aim, lower left arm, lower right arm, upper left arm, upper right arm and the head. In the quest ‘the bouncer’ the barmen tells you to aim for his arms because he always ducks. So click on the blue dots on his arms to change where to aim, so your aims should look like mine or similar to mine, as along as they are aimed at the arms

Now that we got aiming done and over with lets teach you dodging. There are three ways which you can dodge, to the left, to the right and duck, are screenshot of the dodges are below:
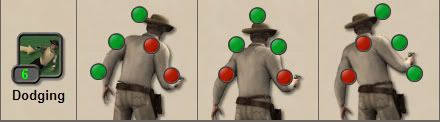
IN the quest ‘The bouncer’ he says to dodge to the left, right and to duck due to him aiming at the head, so do this and you will do the quest easily. Ok now that we got all our aims and dodging in the right places lets challenge our rival, go back to the quest information, where it should say ‘complete quest’ it says ‘challenge rival’ click this and you should win. Once you win you will complete the quest and you will get a report in your reports box showing a video of the fight. If you loose the fight, you will loose all of your money and 1/3 will go to the winning player.
The shots each take turns. There is a random dice roll that calculates your opponents Appearance to your Tactics. Whichever has the higher roll for attacking wins that round and deals damage to the other player. The skills for defense play out on just how much damage that allows.
The person who initiates the duel has to go to the defender’s home town, and can attack the defender even if he’s away. The defender does not have to move at all. The attacks must pay a total of 10 energy to start the duel, the defender loses nothing.
Whoever wins the duel, whether by most amount of damage or knockout, gets 1/3 of their opponents cash, and a percent of experience total to their opponents dueling skill. Motivation also counts here as it would a job, and the amount of experience goes down as the motivation goes down. Motivation restores at 10 per hour. If either player has no money, the winner gets
OK i think I’ve covered the basic for dueling in quests, i will update this once i learn more about dueling with other players and other information. If anyone else has suggestions for this guide on dueling please PM me them.
Sorry Cpt. Marryat if you dont want me to post this here
Thanks to Black Jack for informing me on more information credit goes to him as well
Attribute, Skill, & Labor Points
This is just my short guide on how to use them, where to use them, and what the heck they are.
Attribute Points
There are 4 Attributes:
- Strength
- Charisma
- Mobility
- Dexterity
Each time you gain 1 level you also gain 1 attribute point. Using the attribute point increases all skills listed in the same color by 1.
For Example: When I increase strength, all red skills go up by 1.
Skill Points
There are 20 Skills, up to this point in the game – seen on the Skills menu.
Each time you gain 1 overall level you also gain 3 Skill points.
I recommend that players ration these as much as they can, wasting them can slow a players progress down in the game.
Labor Points
A labor point is simply a number found after doing some simple math.
For each job you have a set of 5 skills, the amount of skill points you have in each area appears next to the nice picture. Simply Add up the skill points and you get your total.
Subtract the pre-determined difficulty of the specific job.
You then find your “remainder” which in this game we call Labor Points.
Labor points show how good you are at working on a job. You need at least one labor point to be able to do the job at all. Bringing in more points raises the wages, it lets you find better items and it lowers the risk to hurt yourself badly.
World 2 Character Class Guide! (Not Available in World 1)
It is all in German at the moment, so I did a quick translation for people.
Basically, at level 10 you choose your character class. There are 4 to choose from.
This choice is final and cannot be changed, I think.


Oh, and to see these choices and choose, you click on ‘Character’ and then the round grey picture of people.

Recent Comments