Shaiya Kiting Defender’s Guide
Shaiya Kiting Defender’s Guide by need2kill5
Hello all existing and hopeful future defenders (and guardians if there are any tanking ones out there) to the ultimate defender’s guide to, well, being a defender. This guide will focus primarily on kiting defenders seeking to duo with mages without the help of a priest. This type of kiting is quite challenging and takes practice, but will make you totally totally capable of leveling without a priest.
First off, you might ask who this random unknown zero karma 2 post loser making this guide is =P. You may have seen me trotting around in the maps of AoL under the name of -Trivalent-, currently lvl 55 HM defender. I also play as an UM priest named AzureHealer and as a 15 HM pvp fighter named -SirGalahad-.
Second, before I start, the content in this guide is not made solely of kiting defenders. In this guide, you will find very useful tips and tricks that are applicable for both a non-kiting and kiting defender (eg. : builds, pulling and taunting strategies, survival strategies).
This is NOT a guide aimed towards stopping you from leveling with a priest. You have every right to make any type of party you want. This is merely a guide to help you be an effective defender, whether you are a kiting or non-kiting defender. Please keep in mind however, that if you are a non-kiting defender and wish to remain that way, that most of the tips here are assuming you are a kiting defender. You will notice however, that many tips may apply to both types of defenders, as mentioned above.
Finally, I will add that THERE IS NO LIMIT TO WHAT MOBS YOU CAN PULL AS A KITING DEFENDER. At lvl 26, I was pulling purple dungeon mobs without a priest. You, as a kiting defender, have this capability of pulling almost anything you want, an ability non-kiting defender do not have.
Now, on to the guide
Table of Contents
1. What is kiting?
2. Builds
3. Skills
- 3.1 Basic skills 3.2 Passive skills 3.3 Combat skills 3.4 Special skills
4. Strategies
- 4.1 The way mobs move/attack/aggro; an important note
- 4.1.1 Movement 4.1.2 Attacking 4.1.3 Aggroing : a theory in question…
- 4.2 Pulling and Taunting Strategies
- 4.2.1 Pulling 4.2.2 Taunting
- 4.3 Debuff Chains
- 4.4 Kiting Shapes
- 4.4.1 The Wide Circle 4.4.2 The U-Turn Oval 4.4.3 The Rounded Square 4.4.4 The Tight Circle
- 4.5 Survival Strategies
- 4.5.1 The defender’s worst nightmare 4.5.2 Aggro offs 4.5.3 When the going gets REALLY tough
5. For the Mages
6. For the Priests
——————————————–
1. What is kiting?
Skip this section if you are familiar with the term.
You may have heard of the term “kite healing” which means when a priest or oracle gets attacked by a mob, he would run a few feet, then cast a heal to prevent from getting interrupted and injured. Kiting, the term itself in gaming language, simply means “running away from a mob (or several mobs) to avoid damage”.
The exact reason why “kiting” was chosen as the term to describe this action is unknown to me, but it can be easily guessed. Normally associated with healers (in any game), a healer would normally run away from a mob, stop for a moment to heal, and run again. He/she would, however, not want to run too far from his/her party to stay within range. If the healer runs away from the party, he would run parallel to the party next, then towards the party, then parallel again (assuming no one helps this poor healer), thus resulting in a square (or most probably rectangle) shape, somewhat like a kite; thus, the possible origin of the word.
Now that that’s clear : the guide.
2. Builds
To tell you the truth, if you have no pvp intentions (since pvp defenders with high def and resist and no attack are rare), there is only one build for Normal Modes and Hard Modes : pure Rec.
This is probably the most standard defender build in AoL. To a Guardian, this might sound odd, since almost 95% of Guardians in UoF are battles Guardians, so don’t judge me as a fool so hastily.
An Ultimate Mode defender can be a bit more creative with his/her build due to the 9 point per level bonus, however, a high amount of defense is vital to any defender, kiter or non-kiter.
Why no Wis or resistance, you ask? Well, you will not be facing much magic damage in your career until much later on (around your early 40s). Even then, as a kiting defender, you can counter that high magic damage with high hp. Duals are also a good solution for low resistance if you are truly concenrned about it. Dual fortune 4 and dual safe 3 are the two most common resistance boosting dual lapis around.
I, however, strongly recommend that if you have any intentions of PvPing with your high def defender, that you seriously consider getting some resistance. I am merely making a guide for PvE purposes, so don’t get the wrong ideas in your head.
3. Skills
This is NOT a begginer’s guide, so I will not list every defender skill. I expect you to have some knowledge about defender skills. If you are, however, unfamiliar with any of the defender’s skills, there are plenty of begginer’s guides for defenders listing their skills with their descriptions.
I will list the skills you should consider getting. Skills not marked with a * are vital skills. All skills marked with a * are skills that are not 100% necissary. I will go more in depth about some of the skills on the list in the Strategies section.
3.1 Basic Skills
Hard Skin, Concentration, Taunt, Self Dispel(HM+), Self Heal(HM+)
3.2 Passive Skills
Body Training, Relax Body, Sharpen Weapon Mastery and/or Blunt Weapon Mastery, Backpack Upgrade*, Interpretation*
3.3 Combat Skills
Curse Raid, Panic(lvl 1 at least), Darkness Blow, Silent Blow, Stop Blow, Slow Rage(HM+), Arachne Range(HM+)*, Ground Boom
3.4 Special Skills
Tactical Formation, Potential Avoid*, Untouchable, Secure Guard*, Power of Guard(HM+), Melee Reflector*
Note : I am unfamiliar with UM skills, so I have not listed them. This guide is centred mostly on the strategy of kiting, not so much about skills and builds. Kiting can pretty much turn any bad build into a good build though practice and skill, so as long as you have the vital skills needed, you can survive without a priest.
You will probably notice that defenders don’t really need that many skills. A lot of the other skills defenders have are mostly damage increasing skills and skills that require Dex to increase its reliability.
Before I move on to the Strategies section, explanation on why some skills were excluded and some included must be done.
Body Training – Ummm, why do I need physical attack? Well, it looks like we’ve discovered a godly typo. This skill does not actually increase your physical attack power. It actually increases your defense (incredible typo!). It’s the same type of typo that was made for Support Spell (states that it increases physical attack instead of magical attack).
Melee Reflector – OH EM GEE, reflect all damage back to mobs!?! This should be VITAL!!! It would be amazing now wouldn’t it… sadly, the reflection part of this skill does not affect mobs. It WILL however block all melee damage, so it can serve as another Secure Guard.
Secure Guard – I did not exclude this skill, but I marked it as unnecissary. It sounds illogical to exclude this skill since it reduces damage but, unfortunatly, this only recudes melee damage by sky-rocketting your defense. I find this rather useless considering the steep skill point cost and the fact that defense is something you already have loads of. The point of kiting is not to avoid magic damage, it is to avoid physical damage, thus, you will not be taking much physical damage while kiting, making this skill not worth the skill points in my opinion.
As an UM, you will have plenty more skill points to work with so you could easily consider this skill; part of the reason why I didn’t fully exclude it.
Health Drain – This skill sounds like a logical skill to add since it heals your HP but, two huge disadvantages arise here. First, it requires a successful hit to work which requires a healthy dose of Dex. Second, by using this skill, you will stop healing from bless for a good 5-6 seconds as well was approach the army of mobs attacking you, resulting in a huge damage intake. This can drain 50% of the HP you just healed and stop you bless heal, whether you miss or not, making this skill more of a liability than a survival skill.
To me, the only logical use of this skill is to save yourself from degens eating away your HP after you mage kills 90-95% of the mobs, leaving one or two mobs to leech HP off, however, the Dex problem arises here as well as the fact that you have Self-Dispel to remove degens. Steep skill point cost and long recharge time makes it even more unreliable.
Potential Avoid – Why is this skill unnecissary? +70% dodge rate when you are at low HP? Isn’t that amazing? Yes, it is quite appealing, but there is a catch. This +70% dodge rate does not add on directly to you current dodge rate. This only increases your current dodge rate by 1.7X. For example, since most defenders have low Dex, you might have 5% (even that is quite generous) dodge rate. When this skill unlocks, you will not get 75% dodge rate like you would think you would. You will actually get 5% X1.7 = 8.5%. So, as you can see, this skill is only very effective with lots of Dex. This skill has a low skill point cost and does make a small difference however, so if you wish to have a little dodge assistance at low HP, this isn’t a bad choice at all.
Panic lvl 2/3 – The effect of Panic itself is useless for you as a pure Rec defender so the only real use to Panic is to pull a single mob out of a group of mobs when needed. If you have the spare points for lvl 2/3 and want it, feel free to get it.
Now that skills are clarified, on to the Strategies section.
4. Strategies
Ahhh yes, here we are, in the Strategies section where this guide will stand tall and shine ever so brightly above the tallest mountains and greatest empires and…. ehh, back to the guide.
The Strategies section will be divided in multiple sections, each describing situations, scenarios, tips and tricks on kiting, your survival and your party’s survival. Now, let us begin.
4.1 The way mobs move/attack/aggro; an important note
If you don’t already know how the mobs in the game are programmed to move and attack, it is HIGHLY recommended you read this section. Why do I bother explaining this? All the kiting shapes I will later introduce to you were created, tested and used keeping in mind how the mobs move and attack. I will refer to this VERY often as I explain the kiting shapes later on. I will also explain my discoveries and theories on the peculiar phenomina of aggro offs. Now, to the point.
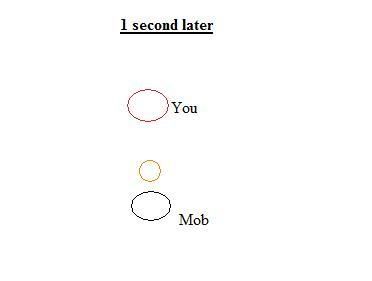
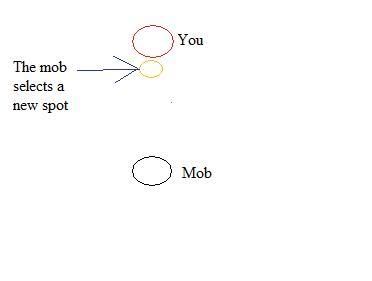
4.1.1 Movement
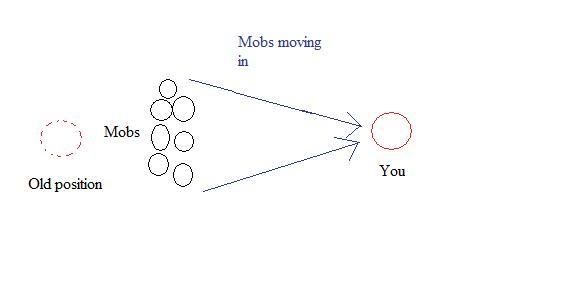
When a mob aggros to you, it is always trying to approach you with the goal to melee you. To get to you, it selects a spot (right beside your current position upon aggroing). The mob MUST move all the way to this spot before it can select a new spot (assuming you moved from your initial position). Once it reaches it’s spot, it selects a new one (again, right beside your current position) and moves towards it. The illustrations below illustrate this.
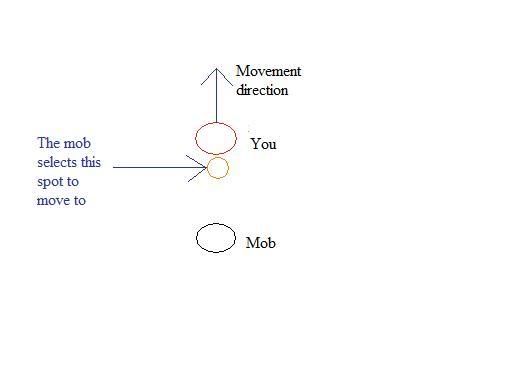
Important notes on the system : When a mob selects a spot, the system actually considers the mob to already be there. So even if it is still midway walking towards it’s spot and you pass right through the mob, you might not aggro it, since the system actually considers the mob to be in the spot it chose to move to and thus, will only aggro to you if you are within aggro range of that specific spot, NOT the actual position of the mob seen on your screen. Be carful of this when pulling moving mobs.
4.1.2 Attacking
When a mob uses simple melee attacking, it must COMPLETELY run to the spot it has chosen beside you before it can attack. Once it reaches that spot, the system checks to see if you are within melee range of the mob. If you are, the mob will attack, if not, the mob will select a new spot close to you and will run to that spot. This explains why you sometimes run straight though a mob and it doesn’t attack you.
HOWEVER! When a mob decides to use a skill or a spell, it will automatically cancel the movement spot of the mob and use the attack! (provided you are within range of the magic/melee skill). This you must absolutely keep in mind, as it will be very important in one of the kiting shapes I will explain.
Mob colour : this is another important part about mobs that many ask questions about. I do know a lot about this aspect of mobs though.
All mobs have their own specific stats (they actually have their own Rec, Wis, Str, Int, Dex and Luc). They are fixed stats that do not change. However, it is the colour of the mobs that cause these stats to change when they are attacking or being attacked by an opponent. Their stats are changed and calculated depending on the colour of the mob compared to the player. Here are the tendecies I’ve noticed.
White, Light Blue, Dark Blue : Defense and resistance remain intact. Attack range with magic and melee drop. Magical/physical dodge rate are dramatically decreased. Physical/magical hit rate are dramatically decreased. Critical hit rate is dramatically decreased.
(The reason I did not say the actual stats (Rec, Wis, Int etc…) were increased or decreased is because, for example, an increase in Rec is illogocal, since it would increase the mob’s HP, which we know never changes)
Green : All stats are intact.
Yellow, Orange : Physical/magical dodge rate in slightly increased. Physical/magical hit rate is slightly increased. Attack range with melee and magic are moderatly increased. Defense and resistance are moderatly increased. Critical hit rate is moderatly increased.
Red, Purple : Physical/magical dodge rate are dramatically increased. Physical/magical hit rate are dramatically increased. Attack range with melee and magic are highly increased. Defense and resistance are highly increased. Critical hit rate is dramatically increased.
Grey : Physical/magical dodge rate is dramatically increased. Physical/magical hit rate is dramatically increased. Attack Range with melee and magic are highly increased (they are surpisingly lower than expected). Defense and resistance are sky-rocketted. Critical hit rate is sky-rocketted (like mad!).
You might also know that mobs stay a certain colour for a few levels (2 levels for Purple, Red, Orange, Yellow, Light Blue, Dark Blue, 3 levels for Green). I don’t know if, for example, a mob that is 3 levels above you (yellow) will have increased stats compared to a mob who is 2 levels above you (still yellow). I am, of course, assuming that you would have not added your stat points from the previous level (for testing purposes) which could affect their damage or attack and cause you to make wrong conclusions.
4.1.3 Aggroing : a theory in question…
What a confusing subject this is. For a long time, I and many defenders I’ve know have tried to find an answer to the peculiar behaviour of some mobs when it comes to aggroing. I, after an extensive career as a defender, have made some very interesting discoveries and formulated my own possible theory for the “aggro system”. First, let me explain my theory.
As most people have discovered, Rec DOES in fact cause aggro upon attacking mobs. However, what system actually causes them to aggro off? Here is my theory :
From what I’ve seen, it’s a type of point system, where each attack you successfully land on a target (misses do not add any aggro at all) add “aggro points” to this mob depending on your Rec. It also seems to be a 1:1 ratio with your Rec. Simply put, if I taunt a mob with 400 Rec, I place 400 “aggro points” on this mob, causing it to attack me. Now, lets take a mage with, say, 20 Rec. Each attack this mage successfully lands on the mob adds 20 “aggro points” directed to that mage. If this mage is weak, for example, and takes a long time to kill this mob, after 20 attacks, he will have accumilated 400 aggro points, and upon the 21st successful hit, he will have hit 420, causing the mob to aggro to him (assuming the defender does not use any debuffs or attacks).
Taunt and Arouse Blow : my theory –> Skills like Taunt and Arouse Blow add extra aggro points on a mob depending on the level of the skill. For example, a 400 Rec defender uses lvl 2 Taunt, and adds 400 + 150 aggro points on a mob. However, another 400 Rec defender, uses Taunt lvl 3 and adds 400 + 250 aggro points.
Mob colour : My theory on higher mob colours is that the Rec:Aggro points ratio is simply deviated from 1:1 depending on the colour of the mob. For example, if you attacked a white mob, your ratio would be 1:1.2. If the mob was green, you would have a 1:1 ratio. If the mob was red, you would have a 1:0.7 ratio (there are only invented numbers, no tests have been made however, it is ture that mob colour does effect the effectivness of aggro).
My supporting expample on this theory : I normally duo in desert with my training partner, a mage. I have 574 Rec and my partner aproximatly 70. When I duo wihtout a priest, he takes about 7 hits to kill all the mobs. In desert, all debuffs fail and mobs, so no aggro points are added upon using debuffs, so the only skill in play is Taunt. I inflict 574+X amount of aggro points using taunt. After 7 hits, no mobs aggro off. In theory, my partner adds 490 aggro points after those 7 hits, showing a sign of credibility to the theory. However, I do occasionally party with a priest, which adds +40 Rec (with prayer) to both of us. The mage jumps to 110 Rec, and I jump to 614 Rec. After about 7 hits (some die in 8, occasionally, depending on how much he crits), mobs begin to aggro off. In theory, I inflict 614+X aggro points, but with the increased Rec, the mage inflicts an additional 40 points per hit. After 7 hits, he inflicts 770 points. If X was less than or equal to 156 points, this scenario would occur in theory thus, increasing the credibility of my theory once more.
Before I move on to Pulling and Taunting Strategies, here are some extra discoveries I’ve made on some questions about mobs.
Q : I pulled a bunch of mobs and Taunted, but when the mage attacked, some mobs ran back to their initial positions! What happened?
A : The mob actually aggroed off. It wanted to attack the mage however, the mage was most probably very far away from the initial position of them mob. You know, of course, that at a certain distance, the mob gives up chase (a particularly important thing to remember when kiting that I will speak of later). The mage, in this case, was beyond the maximum distance of that mob, so as soon as the mob selected a spot beside the mage to run to, the system realizes that the mage is too far and thus, the mob runs back to it’s initial position.
Q : So if your theory is correct, does that mean that when a priest heals before taunt, it inflicts aggro points on a mob?
A : NO!! Priest inflict NO AGGRO WHATSOEVER on mobs. Then why does a mob aggro off when a priest heals/dispels, you ask? I have the answer! The makers of the game realized that priest would never be attacked by a mob since aggro points are only inflicted upon attacking a mob. So, they made a special system. Have you, by any chance, realized that when the priest aggros a mob, it is always the mob you have currently selected? Well, this is the actual reason why it aggros to the priest. Since the makers of the game realized that a mob would never be able to kill an opponent that is constantly being healed, they made a system so that the selected mob of the player being healed will have his aggro points reversed (so : aggro points of player being healed = aggro points of healer), causing the mob to attack the priest. This aggro points reversing buisness is ONLY A THEORY, however, the fact that the selected mob aggros off is tested and true! So be carful of this when pulling. Avoid selecting a mob if it is not necissary (should you be in a party with a priest).
4.2 Pulling and Taunting Strategies
All sections in Pulling and Taunting Strategies assume that you are pulling mobs that are potentially capable of killing you (yellow and above mobs).
4.2.1 Pulling
When pulling mobs, you must remember that your ONLY healing source (other than potions), is bless. Bless healing is automatically deactivated as soon as you attack or use a skill… even if you do so much as attempt to use a skill and fail (due to insufficient range or low SP/MP). This means that it is strongly recommended that you do not use any skills when pulling mobs unless absolutely necissary. If you decided to use skills to pull mobs, you will slowly drop in HP and will cause you to taunt and start kiting handicapped in HP. in low levels, bless is usually strong enough to completely negate all damage taken during the pull itself, causing you to Taunt at 100% HP. Using skills can potentially cause you to Taunt at 60% HP, increasing you risk of dying dramatically.
Q : So I should NEVER use a single skill before Taunt in any case?
A : No, you CAN use skills if you want, you simply run a greater risk of dying. Also, if you plan on leveling on new maps or normal maps, you will realize that mobs are far apart from eachother. In this case, you will want to use Curse Raid/Panic to pull mobs from a distance to avoid losing mobs by running out of their maximum chase range.
4.2.2 Taunting
IMPORTANT –> The mob bug.
Ahhhhhhh, a bug! Get it off me!… Yes, I will have to speak of a bug that makes our lives as defenders quite annoying. However, I have an extremely simple solution to this problem.
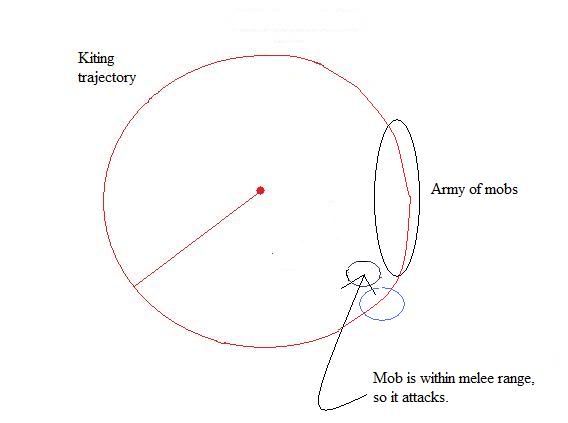
The bug : sometimes, when a mob attacks you, you will notice that it attacks from a greater range than it is normally supposed to (I do know the exact reason why this occurs, however, it is not important to know it and the essential is to know that they will attack from a greater distance occasionally). If you look at the description of Taunt, you will notice that it has a very puny range. When a mob bugs like this, that added 1 or 2 metres is just enough to be out of the range of Taunt (how irritating! >.<). You can test this if you want. Stand in the middle of a room and cast curse raid from the middle on all the mobs. Do not move from your spot and wait until all the mobs surround you. You will notice that almost 50% (yes 50%!!!) will bug this way. Incredible isn’t it? If you have ever been in a party with a defender pulling this way, this is the reason why the mobs aggro off so much.
Don’t panic! I have a very simple solution that literally removes ALL the risk of ANY mob aggroing off. First, pull the mobs as you normally would. Once you get all the desired mobs you wanted, you will notice they they surround you in all sorts of different directions. Simply run away from the mobs in a straight line and let them approach you again. Now they should all be in one tight circle attacking you. You will see some bugged mobs, and some unbugged ones. All you simply have to do it step into the circle of mobs and Taunt! The following images illustrate this.
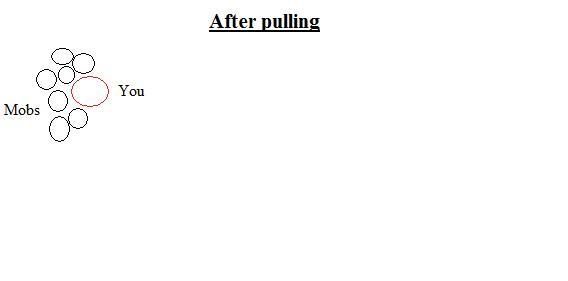
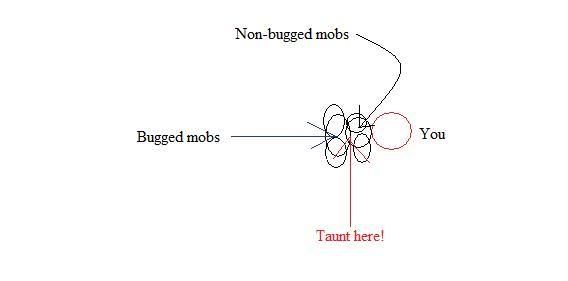
Nice and simple, and it will never go wrong!
4.3 Debuff chains
Of course, you have a vast amount of aoe debuffs at your disposal, so you will probably want to know which debuff combo works best. I will explain this depending on the level of your skills.
In any case, when you use the strategy above for taunting, as the mobs are running towards you, cast Curse Raid to weaken their melee before they swarm you. Then, follow as proceeds :
When Darkness Blow is still lvl 1 : Curse Raid > Ground Boom –> Taunt –> Kite
When Darkness Blow hits lvl 2 : Curse Raid > Darkness Blow –> Taunt –> Kite
(There is no use in using Ground Boom since 75% of the mobs can no longer attack you)
For HMs : when you get lvl 1 Slow Rage : Curse Raid > Darkness Blow –> Taunt –> Slow Rage > Kite
Another good combo with Slow Rage : Curse Raid > Slow Rage > Darkness Blow –> Taunt –> Silent Blow (optional) > Kite
The first Slow Rage combo is more effective on melee mobs since, by using it after Taunt, you get a full 8 second head start on the mobs when kiting
The second combo is more effective against magic mobs. Since magic will cause you to take massive amounts of damage before Taunt, you risk dying from melee attacks. Slow Rage will reduce the intake of damage from the mobs that were not affected by Darkness Blow.
Warning : Using Silent Blow can be more dangerous than helpful against magic mobs in some cases. When you use it, mobs will still attempt to cast their magic attacks. They won’t be able to, of course, but when they choose to, they will keep trying until Silent Blow ends. If about 6-7 mobs try to attack you with magic while under the effect of Silent Blow, they will all instantly use it RIGHT after Silent Blow ends, causing a huge intake in damage. However, in this time, you might have healed enough HP to survive this blow, making it still a good choice to use. Just make sure you brace yourself for this.
I will not add any more than that, those to me are my standard debuff chains. Feel free to play around with yout debuffs and make your own combos. Notice that I did not add Stop Blow in any of the combos. The reason for this is because it defeats the purpose of being a kiting defender. If you stun a bunch of mobs, you will end up having to stay close enough to them so that the mage can continue to aoe the mobs that did not get affected by Stop Blow. This doesn’t mean you cannot do this, but I personally prefer to keep Stop Blow to stun mobs in sticky aggro off situation. You are not me however, so the choice of skill chains is yours.
4.4 Kiting Shapes
The moment you’ve all been tediously reading for, kiting shapes!
Before I start (lol, another interruption), I want to name and illustrate the 4 different types of mob positions you will encounter in your defender career.
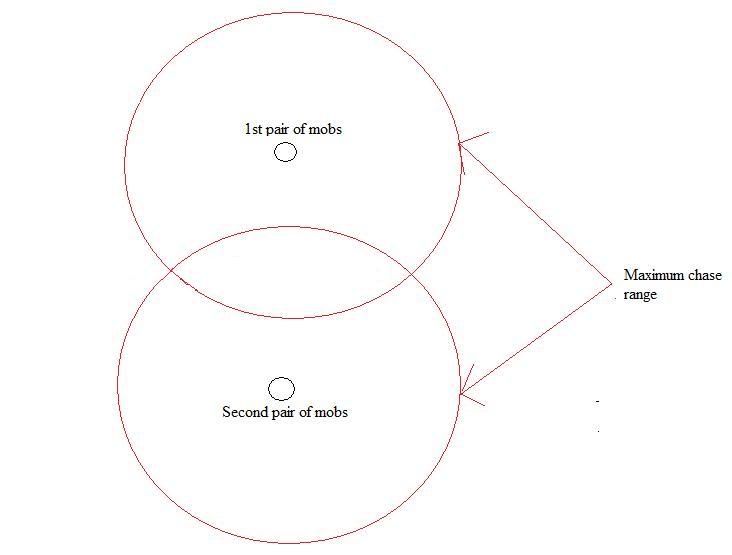
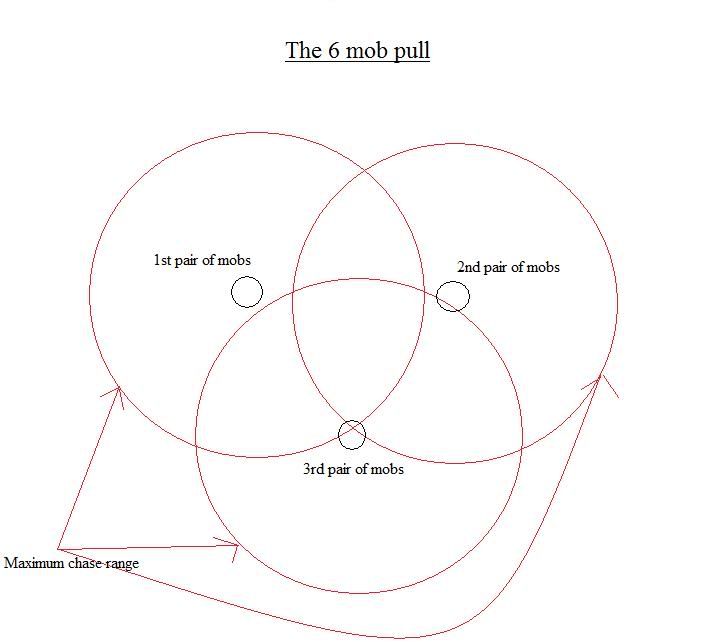
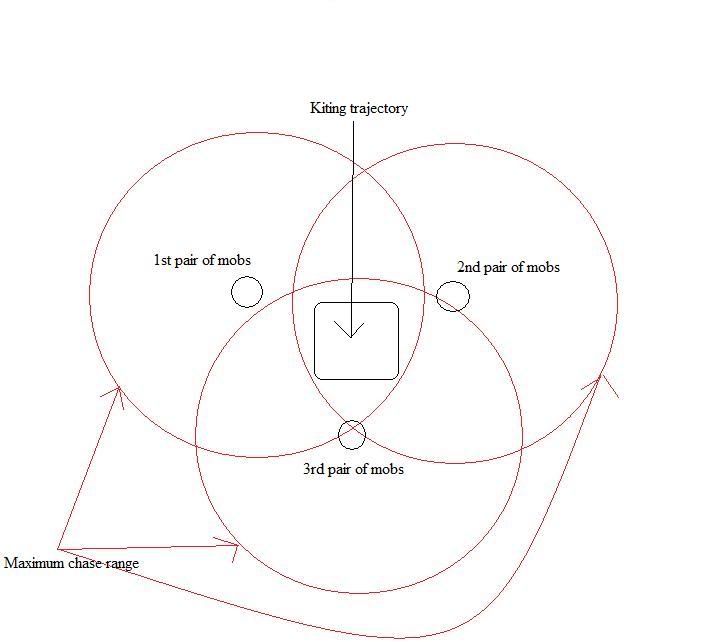
I also would like to define a term, that I used earlyer. I want to make sure EVERYONE understands this because it is VITAL to know as a kiting defender. The term is “maximum chase range”. It is a little self-explanatory. This term refers to the maximum distance the mob will chase you before giving up chase. The maximum chase range is a perfect circle of aproximatly 48m radius (in game metres). This value was guessed knowing that the normal spell range is 24m and you can usually make it follow you another full spell range away (aproximatly, if not, less).
Now, the pull types :
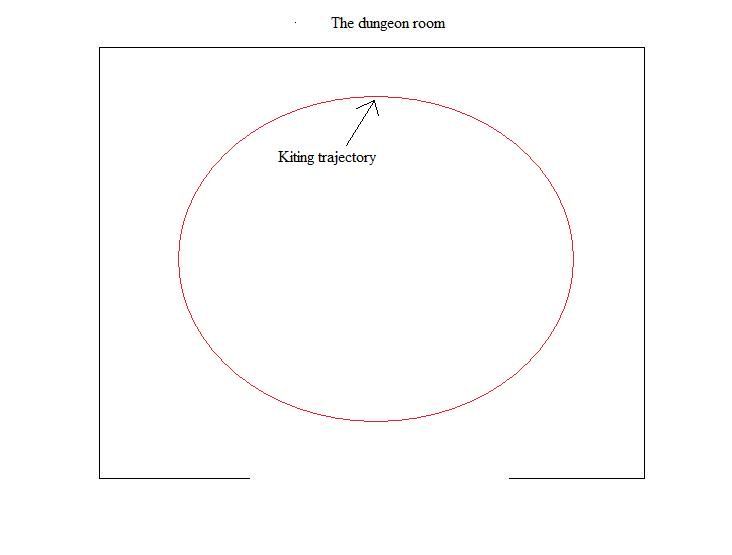
1) The dungeon room/dense map

2) The 4 mob pull
3) The 6 mob pull
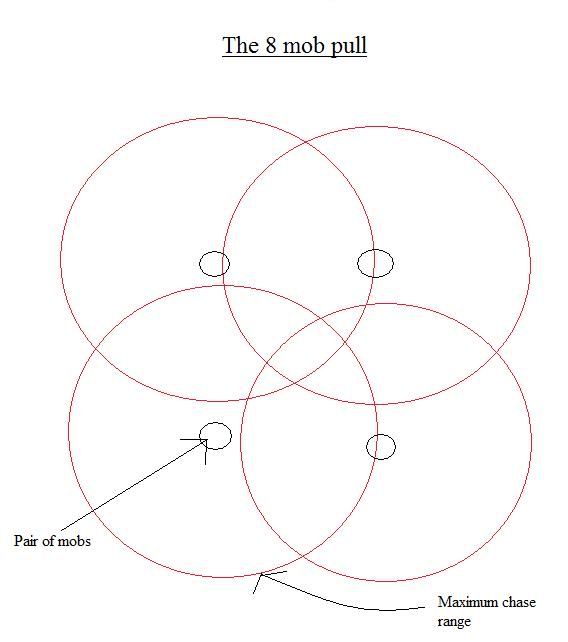
If you are only trying to get to HM with your NM defender, you will likely never encounter the 4 mob pull, the 6 mob pull or the 8 mob pull.
Now, let us FINALLY move on to the kiting shapes.
4.4.1 The Wide Circle
The Wide Circle is the MOST effective kiting shape out of any kiting shape I will introduce to you in this section. It is effective on both magic and melee mobs and reduces you damage intake incredibly (in fact, once you begin kiting, if done properly, you will never get hit by melee once). You might ask then, why arethere even any other kiting shapes if this is the best one? Well, the flaw of this kiting shape is that it take an incredibly large radius. Later on, you will notice that in new maps or normal maps, you cannot use this kiting shape since mobs are too far apart from eachother and you will lose many mobs by running out of their maximum chase range.
This kiting shape is the most effective in dungeons where the rooms are very small and mobs are very close to eachother. Simply pull all the mobs, and run all around the room. Literally make a circle around the whole room.
On top of being effective on reducing damage, it is also effective on doing something I will refer to often in this section which I call “mob recovery“. What in the world is that O.o? I did invent that, I had to give it a name. The concept of this is the following : when a mob uses a magic attack or a long range melee skill, it will fall behind the large group of mobs chasing you and will no longer follow your kiting shape. If you were to kite in a small circle, you will realize that once the mobs starts chasing you again, you will no longer be able to avoid it’s melee. The following images illustrate this :
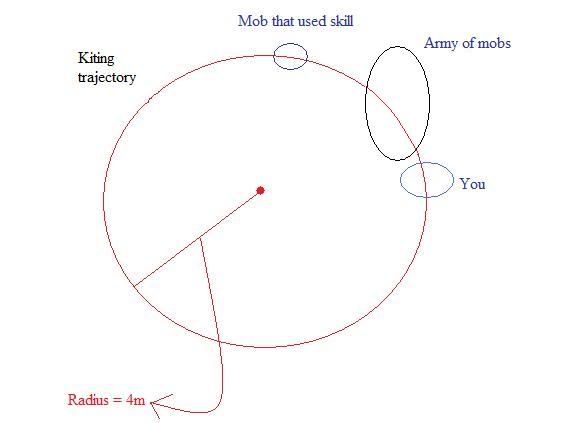
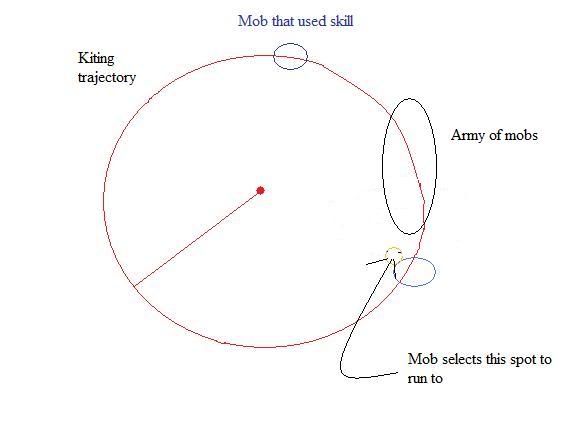
(The images are very disproportionate. For example, the mob army circle should actually be much bigger. The essensial is to know the the circle is small and where a mob will go if it uses a skill)
After the last scenario above, the mob will have to wait again before moving since it just attacked, making it fall behind again, thus, causing it to go back to the scenario in the first image. Every cycle, the mob will attack 4 times.
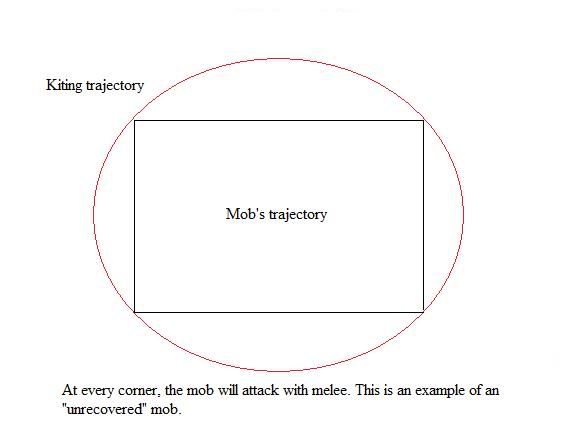
With such a massive circle, you will have no worries of this happening. In the later kiting shapes The Rounded Square and The Tight Circle, this will be an issue.
Final stats :
Effective vs. : All types of mobs
Less effective vs. : None
Cannot be used in : 4 mob pull, 6 mob pull, 8 mob pull
4.4.2 The U-Turn Oval
My personal favorite. The U-Turn Oval is quite simple. After taunting, run in a straight line for a long distance to seperate yourself from the mobs. Once you think you went far enough, make a hard U turn (not too tight so you don’t pass right beside the mobs but not to shallow to cause your trajectory to deviate) and then run in a straight line again (the same distance as you ran in your first straight line).
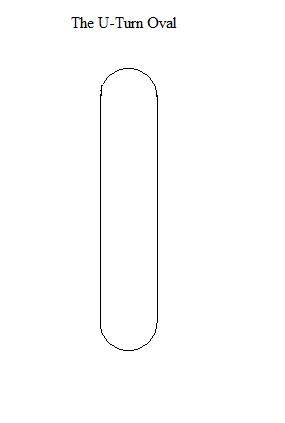
How it works : when you run in a straight line, you make a lot of distance on the mobs, however, on your U-turn, mobs gain a lot of ground on you. The goal or running in a straight line again is to regain that lost ground before the next U-turn. If preformed properly, you could take less that 3 hits per turn from melee (I have done 0 hits many times before with this shape).
Effective vs : Magic mobs
Less effective vs : Mobs with melee skills –> reason : if you remember from what I said earlyer, when a mob chooses to use a skill and you come within range of that skill, the mob will automatically stop moving to where it was going and use the skill. When doing your U-Turn, you will pass rather close to the mobs, and most of the times, you will be close enough to get hit by the melee attack. This does NOT mean that you cannot use this shape on melee mobs though. It is still effective vs. a mix of magic and melee mobs.
Cannot be used in : 6 mob pull, 8 mob pull.
This kiting shape is the second most effective shape when reducing damage. But what makes it shine bright is its shape. You can use this kiting shape in a situation where two mobs (or two pairs of mobs) are very seperated from eachother. The following image illustrates how :
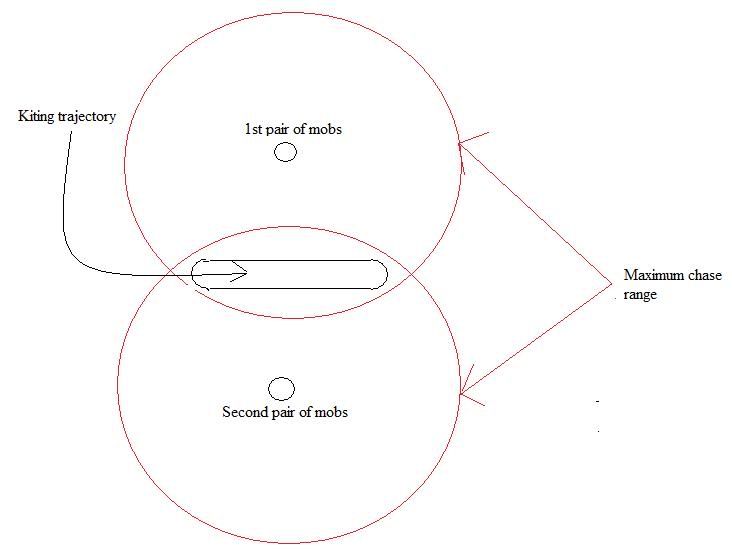
So it can surpisingly be used in the 4 mob pull.
4.4.3 The Rounded Square
This kiting shape is a very effective shape when used in the 6 mob pull. If made large enough, it can easily recover mobs that have used magic or melee attacks attacks (remember : definition of mob recovery). If used properly, you can almost avoid ALL melee attacks even in a small kiting area.
How it works : like the U-Turn Oval, the short straight lines of the sides of the square are meant to increase your distance from the mobs. The rounded edges enable you to avoid melee attacks just before you start the next side of the square. If you were to make a sharp 90degree turn with your mouse, you will notice that you will get hit a few times by the mobs. The round edges prevent that from happening. Here is how it looks in the 6 mob pull :
An important thing to remember about this shape is that, if it is made too small, it will result in lots of unrecovered mobs, causing 4 melee hits per cycle (like the circle shown in the Wide Circle image, only this time, the unrecovered mobs will attack in the centre of each side of the square). If you notice that your 6 mob pull involved 3 pairs of mobs very far from eachother, this shape’s effect becomes ineffective and will result in the same damage intake as the final shape I will introduce to you, the tight circle.
Final stats :
Effective vs. : Melee mobs
Less Effective vs. : Magic mobs
Cannot be used in : 8 mob pull (it CAN be used in an 8 mob pull, but it will not reduce you damage intake any more than the tight circle)
4.4.4 The Tight Circle
This kiting shape is the least effective damage reducer, however, it’s better than just standing still >.> This shape is made for those very far apart 6 mob pulls and those rare 8 mob pulls that you attempt to try (and occasionally succeed =D). This shape results in, pretty much every mob becoming and unrecovered mob. Simply put, the wider you make your circle, the less damage you will take from these unrecovered mobs (quite trivially) but you must remember that when you are forced to use this kiting shape, you are playing with a sensitive pull. The slightest overshooting will cause you to lose a pair of mobs. There is not much else to say about this shape.
Final stats :
Effective vs. : None
Less Effective vs. : All types
The only kiting shape capable of doing 8 mob pulls and some 6 mob pulls.
4.5 Survival Strategies
In this section, I will just place a few tips and explain what I do in certain scenarios where the situations get a little sticky.
4.5.1 The defender’s worst nightmare
Fluffy bunnies and rainbows!!! AHHHHHHHHHH!!!!…… Unfortunatly, this nightmare is not game related =P.
The real nightmare : Degens
You will HATE degens. I don’t care what person you are, if you are a defender, you will HATE degens. An important thing to know about degens is that it does not remove a specific amount of HP depending on the mob, it actually removes a percentage of you HP. This is a huge problem for us because, no matter how much HP or Rec we add, it still drops our HP at the same speed. Oh noes >.
1) When the going get’s tough, Untouchable + Self-Dispel. So you drop really low in HP and you have a degen. Your pots are recharging and suddenly, a mob aggros off. Poor you D=. Well, I made Untouchable and Self-Dispel a vital skill for a reason, and that’s for degens.
2) Dispel pots. Don’t use them EVERY time you get a degen. Just use it the same way you use Untouchable + Self-Dispel (I am particularily speaking to NMs who will not have access to Self-Dispel).
3) If you are HM, you can use POG at lvl 49 (Power of Guard), another alternative to Untouchable if it is still recharging.
NOTE : Remember that Self-Dispel and dispel pots will not dispel all types of degens (unless you have lvl 3 Self-Dispel), part of the reason why they are such a drag >.<
As you can see, there is not much to you can do when faced with degens. If possible, it is best to avoid pulling mobs that have 2 different types of degens, as these are the most fatal mob combos.
4.5.2 Aggro offs
It’s inevitable, no one is perfect. The mage might accidentally press a spell hotkey or not see you taunt and assume you did or, you might make a bad taunt in desperation causing mobs to aggro off. What should you do?
1) Stop Blow. If a large amount of mobs are charging the mage, use Stop Blow to stun as many as you can and manually take the mobs that it failed on. Once you aggroed them all back, retaunt like you would as if the event never happened.
2) A single aggro off to the mage : once again, Stop Blow is a good solution. However, what if you were faced with the scenario I used in the Degen section (it sounds quite unlikely but, trust me, i’ve been in it 101 times) and you are worried that by using Stop Blow, the mobs will catch up to you and kill you? For a NM, it’s time for a little Untouchable. Cast it and manually get the mobs back using either Stop Blow, Darkness Blow (to stop melee attacks on the mage) or curse it back. For HMs, lucky you! You get POG at lvl 49 which will give you and your mage invincibility.
3) Darkness Blow, I mentioned its use above
4) Arouse Blow. In some cases (like in dd1 (Deep Desert 1 –> new map)), mobs will not be affected by debuffs, so Stop Blow, Darkness Blow and Curse raid/Panic are no longer options. In these cases, if a single mob aggros off due to a bad Taunt, Arouse Blow would be a very good choice since it stops you from having to retaunt (since it is just as effective as Taunt). Remember, however, that you must be within melee renage of the mob, so make sure you don’t lose any mobs due to walking out of their max chase range (in times like these, it would be good to tell your mage to run to you if that situation would ever occur).
5) Retaunt. This demands cooperation with your mage. Your mage will have to run inside the group of mobs on you (this also means you have to stop kiting for a moment), the mage must stop, let himself get hit (to give time for you to Taunt), then run. This would also be used in a situation where debuffs do not affect mobs.
4.5.3 When the going gets REALLY tough
Restart. There is no use in fixing something that is broken beyond repair. You will waist more time, potions and long recharge time skills trying to fix a huge mess than just running away and restarting the pull from scratch.
5. For the Mages
This section will just compose of a few tips for mages to help their kiting defender’s and be a little more useful when it comes to sticky situations. As you might know, partying with a kiting defender permanetly or very often presents new and different strategies.
1) Avoid using stuns. With a non-kiting defender, stuns are very handy as they dramatically reduce damage. However, for a kiting defender, they are actually quite the nuisance. When you stun the mobs, you cause them to deviate from the defender’s kiting shape, causing many unrecovered/seperated mobs making both your defender’s life and your life more difficult. If you plan on using stun often in a pull, be sure to warn your defender, so he is ready to re-ajust his kiting shape after the stun. Ideally, stick to wind or fire if possible.
2) Keep an eye on your target. This is probably the most irritating part about leveling with a kiting defender for mages. Often times, you will see that your target or other mobs may break away from the pack causing them to be out of your aoe range. Keep a good lookout on your target and be ready to switch it once in a while to maximize the effect of your aoes.
3) TANK!! So what if you’re a 3 hit ko! That’s 2 hits more than a 1 hit ko, use those two hits worth of time to your advantage. Don’t panic and run everywhere when a mob attacks you, run away a bit, aoe, run again, aoe or quickly kill the mob attacking you. You are NOT helpless.
4) Watch your position. When a mob aggros off to you due to an accident by your defender, make sure you are within the maximum chase range of all the mobs. If you stand really far away from the mobs in a 4 mob, 6 mob or 8 mob pull (especially on those godly 8 mob pulls =D), you might cause some to run back to their initial poistions if one aggro off by mistake.
5) Your best way to save your defender and yourself is kill faster! So a mob aggros off and starts attacking you and your defender is at 10% HP and cannot risk using Curse Raid/Panic to get it off you since he might die, what do you do? Stun? No! Stunning waists 3 precious seconds and provides little help and damage. If you kite and aoe the mobs on your defender, you could finish off a bunch and enable him to get that mob off you. But now lets say you have no mob on you, but your defender is low on HP. Stun now? NO!! Again, you jepordize his life by leaving him helpless for that long 3 second cast, THEN you throw off his kiting groove? Baaaaad move. Just spam you fastest killing spells =).
6) Use Potential Motive to your advantage as much as possible. Skills like Trubulence, Chain Lightning and Sonic Peeler become instant recharge when Potential Motive is unlocked. Of course, I would be only stating the trivially obvious by saying only that so there is more to it. Health Assistant (which you would certainly want to use if your HP dropped low enough to unlock Potential Motive) will recharge instantly as well. You can cast HA once more right before Potential Motive ends to maximize it’s duration as well as have it ready for use again immediatly in case of another sticky situation occuring during the recharge time of Potential Motive. Many littles tricks can be played with Potential Motive, so be a little creative with it =).
I’ll add more as they come to mind.
6. For the Priests
1) Dispel, dispel, dispel!! So your defender drops dramatically low in HP due to 2 degens and some pretty tough mobs. Don’t panic and spam heal! You will notice that those two degens are completely negating your heals. If you continue to spam heals, his HP will not go up over time. However, if you throw a dispel then heal, now you’ll see it going up.
But dude, if I take the time to dispel, he’s gonna die >.>…. WRONG! You will notice that all or almost all the damage he is taking is due to the degens! He is a kiting defender, he takes very little melee damage. 10% HP can hold him up for 20 seconds without degens! (Sorry of the sexism, typing his/her constantly is irritating >.<)
2) Healing Prayer does not void Healing. 0.5 seconds is an eternety. Anything can happen. At lvl 3 however, it is probably safe to say that Healing Prayer voids Healing. Just make sure you keep Healing lvl 3 handy in case. This is particularily true for a non-kiting defender which has a very steady net HP loss/gain per second.
3) Watch the debuffs on your mages! The best example is Mental Smasher. Make sure you keep this off mages as much as you can. Remember however that this is NOT a priority. If your defender is critically low in HP, it is not important to save a mage a few damage per hit.
Also, try not to dispel every debuff off everyone. For example, Mental Smasher reduces your attack. Why dispel it off yourself and your defender? You two don’t do any damage, so just leave it. If a debuff does not reduce your effectiveness of doing your job, you should not even touch it until the end of the pull.
4) Set yourself some priorites. Basically, this somewhat sums up tips 1-3. If your defender takes damage primarily from degens, focus on those more than spamming heals. If a nasty debuff affects your mages ability to kill dramatically (eg. : Invader = dramatic drop in Wis causing your mage to miss often), then make sure you watch for those.
5) You are not a priority. It is sad but true. If a mob attacks you and your defender removes it off you, you might be tempted to heal your lost HP. However, you are no longer being attacked, you will cause your defender to be heal-less for 5 seconds if you waist time healing yourself when you are not under threat of death.
6) Be creative with Potential Motive as well. Again, I am restating what I said for mages. Few good things to remember is that Recovery and Instant Heal will have no recharge time while under the effect of Potential Motive; two very good life saving skills. Again, possibilities are endless with Potential Motive, so put your creative hat on and do some magic!
I’ll add more once they come to mind.
——————————————————
Well, there you have it, your complete guide on being a kiting defender. If you have any questions or suggestions, feel free to post them below. I will continue to update this guide if I discover new strategies as well as add a FAQ, should I get some questions often repeated by people. If there is anything important and vital that i did not mention, please post that below as well.
Happy leveling =)
FAQ
Q : When my armour’s durability hits 0, what will happen to it?
A : Nothing. You will not lose the armour, nor will it eventually break for any reason. However, you WILL in fact lose one property of your armour (in fact, 2). You will lose the natural defense and resistance that the armour provides for you. NOTE : the lost defense will not show in your stats log! I have tested this personally long ago, at the same bless, with the same armour on the same mob with the same attack (just a normal melee attack). You will not lose bonus stats added on your armour (such as Rec, Dex, Str, Wis, Luc and Int). I am not sure if you lose defense and resistance gained from dual lapis when durability hits 0, I may test this soon however and get a straight answer for that. EDIT : You will NOT lose defense or resistance added by dual lapis! Woot.
Extra Facts
1) Slap (common mob skill) is NOT a physical attack. It is a magical attack.
2) When multiple peices of armour are equipted, durability loss is distributed between all peices. This means that if you were to wear only a single peice of armour, your durability on that armour will drop much faster than if you were to wear all your armour.
3) When under the effect of silence as debuff, you cannot use any aoe skills, buffs, Taunt, or Curse Raid/Panic. While under the effect of darkness as debuff, you cannot Taunt, use buffs, use aoe skills or use Arouse Blow. You can however use Curse Raid/Panic.

Recent Comments